Bulk management of a second product description in PrestaShop
A classic use of custom fields is to display a second description on product pages. That is, additional information, in plain text or HTML, often multi-language and multi-shop, at a different location from the summary or long description.
After adding a new heading to the existing product_lang table, which already contains other translatable product texts (name, summary...), this article will show you step-by-step how to display it in Merlin Backoffice ® Flex, to then be able to edit its content more quickly product by product or en masse.
Adding a new field to a database table
Imagine that on your site, in the product pages, you wanted to add a second HTML text zone, to display a second description, containing HTML.
In this case, you would need to add a text type heading directly in the product_lang table, like this

Display the heading in a Merlin Backoffice ® Flex custom column
The management of personalized or custom fields, i.e. non-native data added to native tables or to tables that are themselves non-standard, can be achieved thanks to the concept of perso columns.
- In the column configurator, look in the left-hand table for the "Custom" block and drag one of the perso columns to the right-hand table.
- To open the custom column editor, right-click in either of the two tables.

With the custom column settings window open, simply follow the 5 steps. Step 1:
- We've added custom column N°3. Let's start by associating it with the table containing the second description. To do this, simply pull down the list of tables in the database...
- ...and select the row of the product_lang table (you can also find it quickly by typing the beginning of its name, starting with the prefix: "pscw_product_l...")

- Now scroll down the list of table headings.
- To select our custom heading "Description2".
- Step 2: in the next column, "Data type and processing", leave the default value "Unique values", as a product can only have one value associated with this field.

As this custom field has been added to a base table, already known to Merlin Backoffice Flex, the rest of the settings below can be completely ignored, as the tool has already checked and pre-filled for you what is required. Without touching anything else, this will work.
Let's take a look anyway, as this is a tutorial:
- Step 3, the filters. The "Filter by product" box checked itself, because the software went to read the table indexes and knows that id_product is one of the elements of the compound key. In 99% of cases you won't need to worry about this setting.
- Same for id_shop.
- And for id_lang. So basically this means that Merlin already knows that in this table, product-related information is stored that may be different for each language in each store (in the case of a multi-shop configuration). It will take this into account when reading and saving data.

- Step 4: the joins. Quickly leave the "Automatic join" column. You'll see examples of its use later.
- And the "Filter or manual join" column. Let's ignore for the moment the other columns further to the right, useful only in far more complex cases.

- Step 5: click "Validate" to save the settings and exit the window.
- If you haven't already done so, the program will ask you to check "the eye" to validate the display of the column and to give it a non-generic title.

- Once back in the column configurator window, note that here too you can check or uncheck the eye for each row and change the title to be displayed.
- When this setup work is complete, click on "Validate and close".

Modifying values stored in custom field
Once out of the table configurator. We see that the product table now displays our new "Description 2" field.
Entering its content, product by product, is perfectly possible, as with any other native field.
In the example below I've just entered simple text, but I could just as easily enter HTML text, like <h3 class="toto">This and a subtitle</h3>.
And as usual, the value is saved the moment you exit the line (we'll see later that automatic saving can be disabled in the "Calculation Options" panel and performed on demand):

But where Merlin Backoffice ® Flex becomes truly magical is that all its mass processing tools are now available on this type of column too.
For example, to copy the second description of the first product identically to a selection of other products, simply:
- Select them.
- Right-click on the value to be copied.
- Then choose the Paste option from the context menu, like this:

- And finally to confirm that the contents of the personal columns (in this 1st example there are no others) are saved in the database.

Result after copy and paste:

Second possibility, using MagicEdit and MagicFormula.
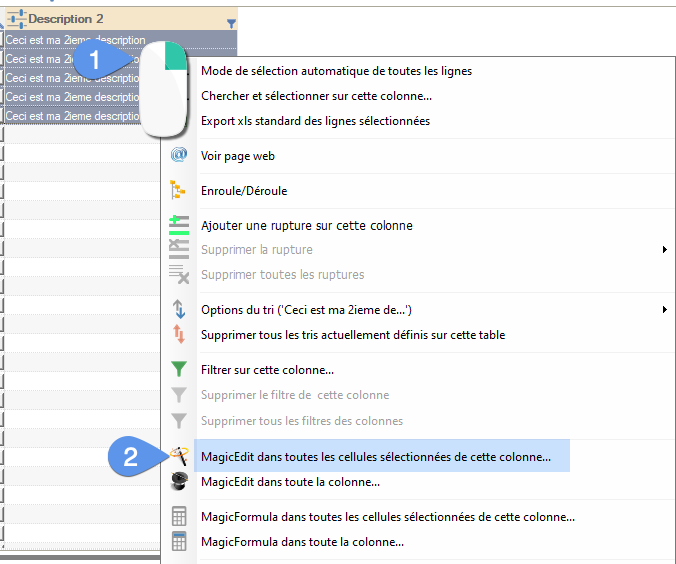
- Selected products, right-click again in the column to be modified.
- Choose the "MagicEdit in all selected cells of this column" command.
Imagine that we wanted to complete the current content of each second description with the text "product N°x", with x being the product ID number. We could do this with this setting:
- Click on "Add text at the end" and enter the beginning of the text "product N°".
- Click on "Insert content from other columns" to activate it and in the "Column 1" selector, choose "product ID".
- Click on "Phase 1...".

- To save in the database, you then have two choices, either check the "Save custom columns" option below the "Phase 2..." button.
- Then click on the button:

- Or don't check the "Save custom columns" box, but click directly on "Phase 2...", then in a second step call up the right-click context menu.
- And launch the save custom columns function:

Time-shifted registration allows you to fill several personal columns before registering the whole. We'll look at concrete use cases in future tutorials.
The result will be identical whatever the recording method. The modifications are now in base and the second descriptions can be displayed in the store.
On the front office side, there are of course a few additional steps: the product.php template needs to be enriched so that it too can read this new heading, and the theme's product files need to be adapted to add the display to the desired location. This can be achieved using override techniques or hooks. As this last step is outside the scope of this tutorial and varies according to the version of PrestaShop and theme used, it is not presented here and should be entrusted to your webmaster.
This first example shows just a tiny fraction of the possibilities offered by this hyper-powerful tool. We now invite you to take a look at the other examples below.
This first example shows just a tiny fraction of the possibilities offered by this hyper-powerful tool.
Category's other articles Mass management of custom fields
-
Custom supplier fields
How to
A revolutionary method for managing additional information in your PrestaShop supplier files
-
Mass management of new Easy Tabs
How to
Methodology for mass-managing Easy Tabs content in PrestaShop product pages