Import into custom fields
PrestaShop may be a very complete software package, but it often happens that an e-merchant needs to import data into customized, "non-standard" or free fields that he (or his webmaster) has added to the database.
We could cite a large number of examples: importing a second html description in a new text block, importing recommended retail prices, importing specific prices in a marketplace like Amazon, managing supplier stocks in a second stock column, importing the customs code requested by Colissimo. ..
Natively, PrestaShop's back office doesn't allow you to carry out this type of import, so you either need to use a dedicated tool, or an alternative back office that is capable of doing so, such as Merlin Backoffice, from its version 1.6.
How to add a new custom field to the PrestaShop database
The simplest method, install a module that adds additional tables and fields to your shop
.
For example, the Amazon module adds tables to the database that are specific to it, and one of them contains a "Net Price on Amazon" heading that may contain a sales price specific to their marketplace and a whole bunch of other mandatory information that doesn't exist in PrestaShop: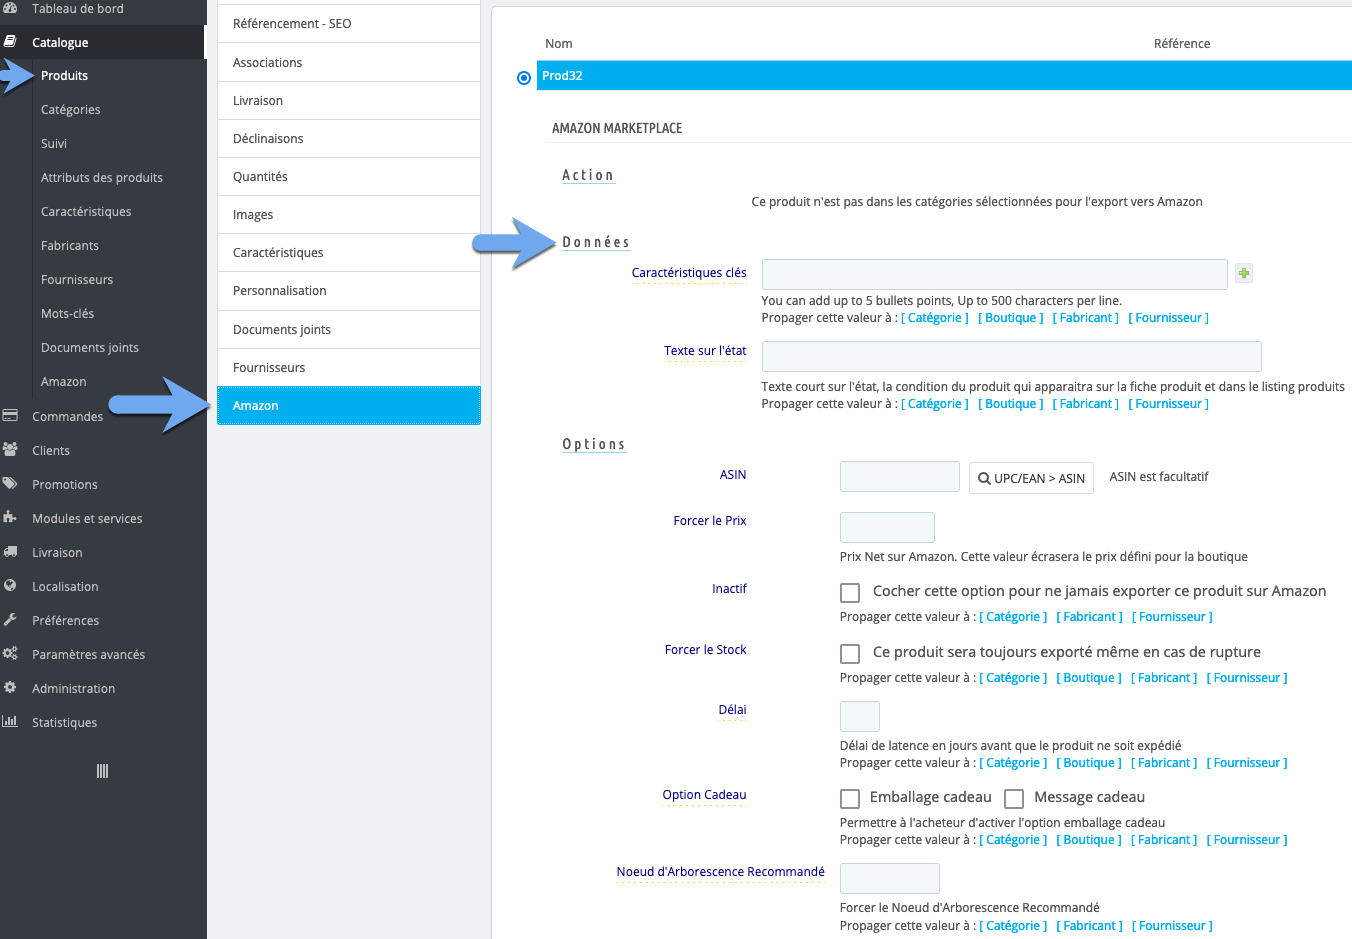
The big drawback of this type of module is that to fill in this type of field, you have to do it one product at a time. Open the file, go to the module tab, enter the values, save, return to the product list, open the next file... it's a big waste of time.
For a long time, thanks to the "personal columns", Merlin had already been saving time by allowing you to fill in this type of data directly in the product table, line by line, with automatic saving in the database when you move on to the next line.
As you'll discover below, Merlin now allows this type of data to be entered en masse from csv or Excel files.

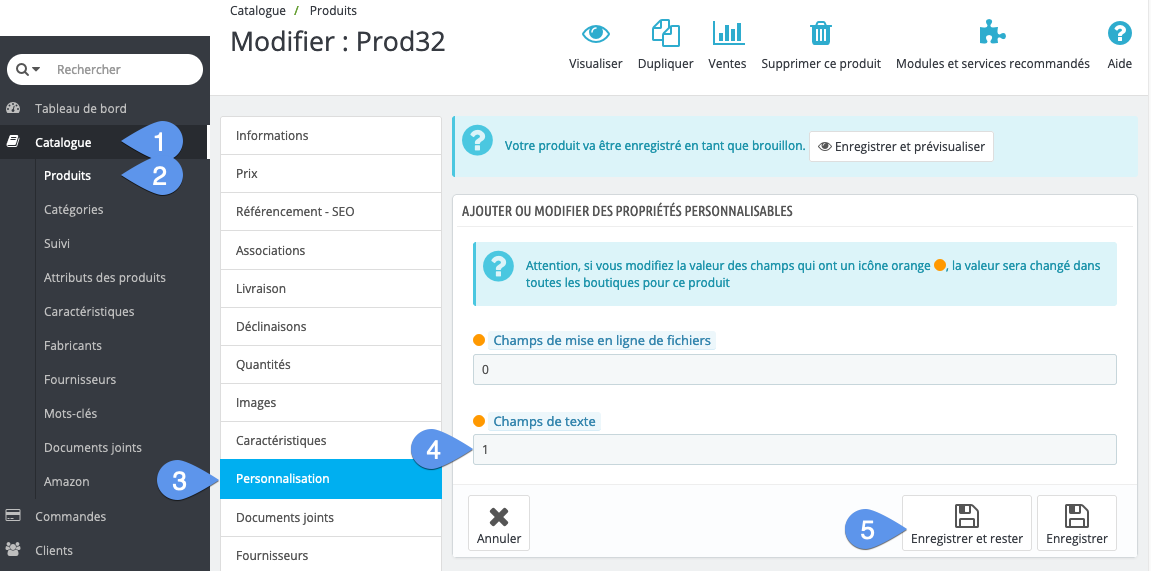
Add a customization field in PrestaShop:
- Go to "Catalog"
- Go to "Product"
- Then go to "Personalization"
- Select for both field types, file or text, the number of customization fields desired .
- Save
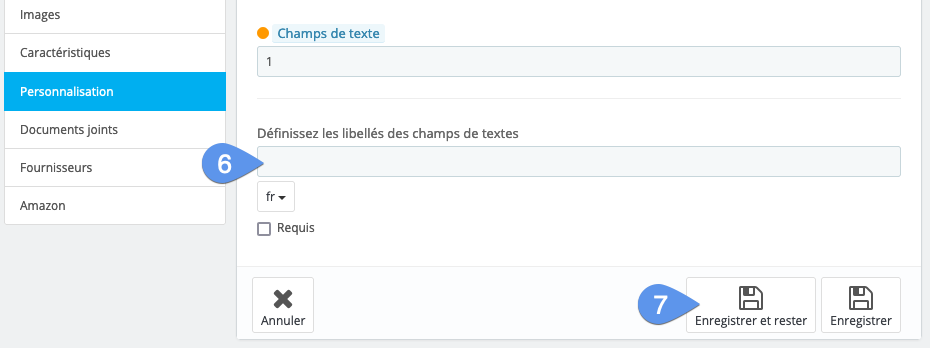
New settings appear, allowing you to choose the file name or text field label (the instruction).
- Enter text
- Re-enter
Add a free field in one of PrestaShop's native tables.
This requires the use of a MySQL database management tool, such as PHPMyAdmin, often included free of charge in your hosting CPanel.
If you have no knowledge of MySQL or sql, or of this tool, it's imperative to follow a few tutorials on MySQL databases, to understand some basic concepts such as identifiers, linked tables, indexes, typing, unique keys, auto-incrementing fields, null value management... and on PHPMyAdmin itself. However, you don't need to learn the MySQL language, which allows you to write queries to read or modify data, that's Merlin's job.
Or entrust the job, which is all in all very simple, to a webmaster. It's not complicated to do, but playing with the database is very dangerous when you're tattooing.
Best advice: always make a backup of the database beforehand.
- Once in PHPMyAdmin, select the database
- Select the table in which you want to add one or more fields
- Go to the "Structure" tab.
- Under the current list of columns, choose the number of new columns you want and click "Execute"
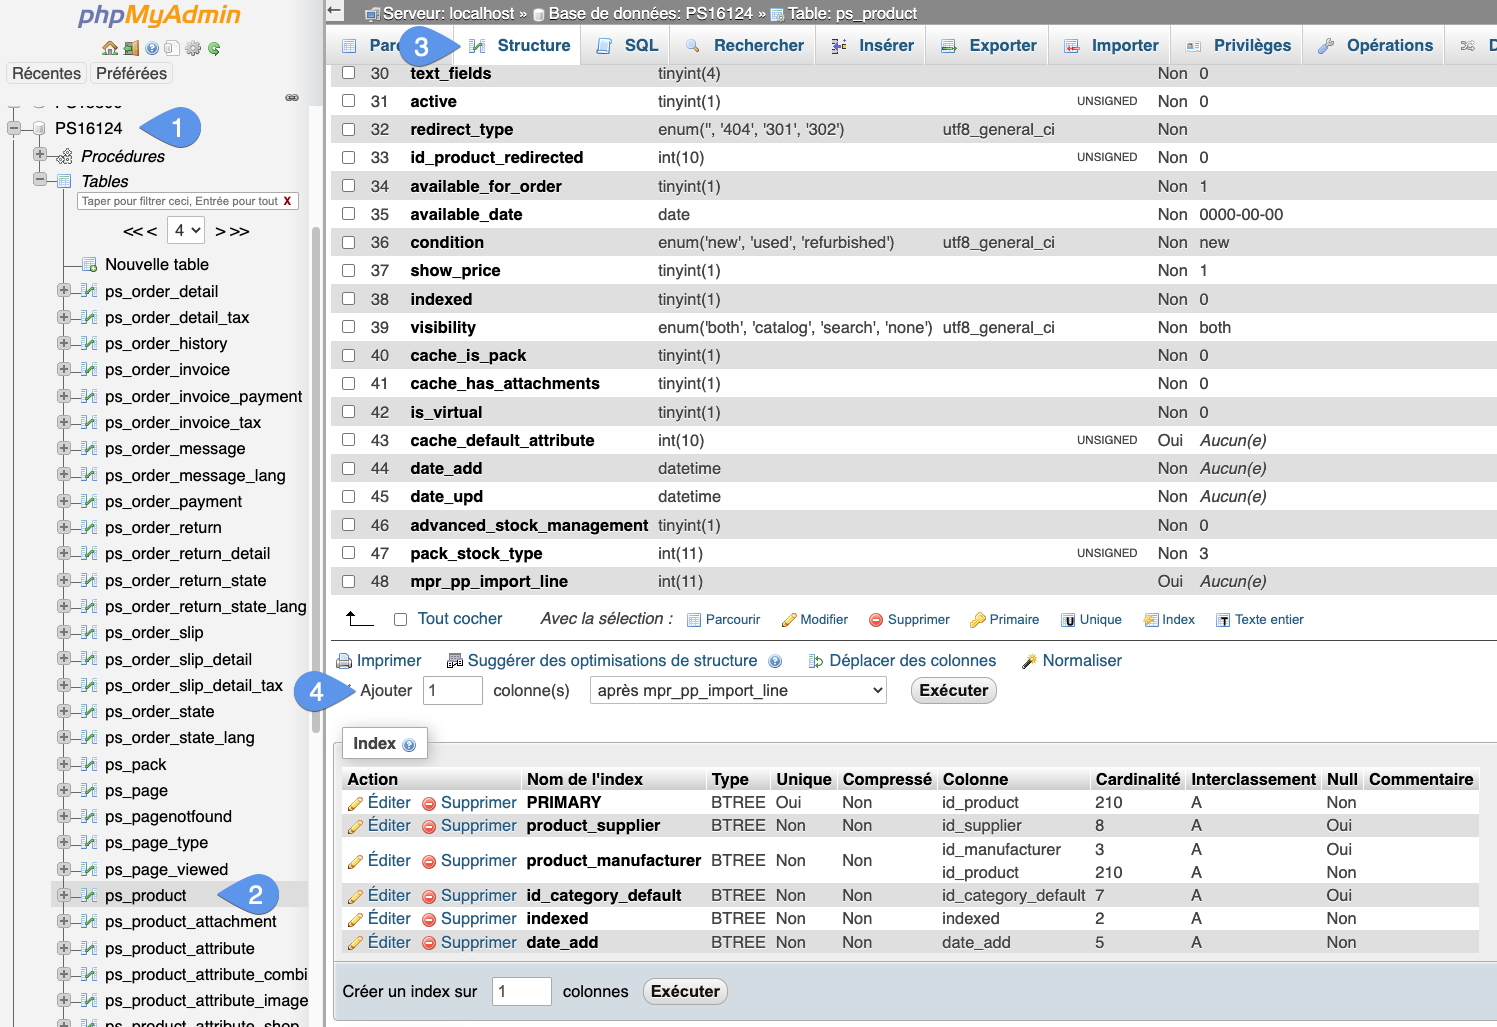
In the add columns form, choose or enter the critical info:
- Give your column a name, avoid spaces and special or accented characters.
- Choose the column type, Text for text with no size limit, Varchar for short text, INT for an integer etc.
- If the type is Varchar or a decimal number, you'll need to specify its size or the number of decimal places.
- Choose default value.
- Choosing the interclassification, also known as encoding. For PrestaShop we recommend choosing UTF8 General CI, except in special cases.
- Check this box if you want to allow this column to contain null values. If unchecked all current table rows will be modified and receive the default value defined in 4.
- To be filled in only if this column is to be defined as a key or index.
- A.I stands for Auto Increment. To be ticked if this is an INT type column that should increment each time a row is added (in short, an automatic counter).
- We advise you to add a small comment so that we know who added this column.

If you also want your custom fields to be visible in the PrestaShop admin, things get really complicated, because in addition to adding them to the database, you'll have to modify the PHP code, if possible using a hook, or else by the override method:
- The PHP code of the object (e.g. class product), to add the heading.
- The object's controller code, so that it can read and modify the values in this field.
- The Smarty code of the tpl or Symphony file displaying the object in the admin to manage the display, see the entry of the new heading where you want it.
And if the data is to be displayed in the store, for example on the product page, you'll need to do the same type of work, particularly on the code of the theme tpl files.
Cleanly modifying the code and theme is only feasible by a real programmer, so don't get into it if your real job is to be a shopkeeper.
Install a PrestaShop module for adding custom fields.
At Sitolog, we've developed one that lets you add additional tabs or drawers to your store's product page, containing any type of data, from simple text block fields to sophisticated HTML pages. This content can be customized per product, making it unique, or common to several products.
This module, however, only works with PrestaShop 1.5. Versions for PS 1.6 and 1.7 will be developed the day the technology used by PrestaShop is stabilized.
But on the PS marketplace, there are many other modules of the same type, admittedly less flexible but which allow, for example, to display a block of HTML text anywhere on the site's pages.
If your problem is simply to enrich your product pages with new blocks of rich text, there's a little free module that does the job. Here's the link to an explanatory tutorial (in French). You'll have to get your fingers into the tpl code of the product file and the shopping cart, but it's pretty easy to do.
And then you'll need a quick tool to import the HTML code of each item into these blocks, hence the interest of Merlin Backoffice.
Importing PrestaShop free fields with the Merlin Backoffice module - what type of files?
This is one of the great new features of Merlin version 1.6. It allows you to import into virtually any type of custom field, from any table.
The starting point is to have or make a csv, xls or better xlsx file containing the data. Two columns are all that's needed: one containing the data for the personal field, and another to identify the related parent, i.e. the product, declination or category to be modified.
Merlin can import this type of file both to create the item (product. .), or just to update it (modify the values in the custom field).
As with all other headings and columns, the column containing custom values can have any title, as long as it's non-empty and unique.
However, you can save even more time in the processes below, if from the outset you think of naming this type of column in such a way that Merlin understands all by itself in which column of which table of the database it must import these values. To do this, the column title simply needs to be in the form "nomdelatable point nomdelacolonne".
Ex: to import into the prix_amazon column of the ps_amazon table, simply title the column with ps_amazon.prix_amazon or amazon. prix_amazon (you can do without the prefix, if it's the one common to the other tables in the database, defined in PrestaShop's configuration).
An example of a test file with several import columns in custom fields:
Once your file is ready, launch the import window from Merlin, as usual, create a new task and fetch your file in step 1: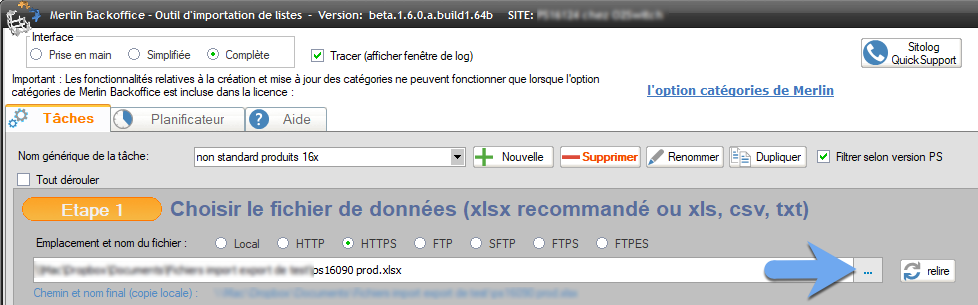
Map columns from cvs or Excel file to non-standard fields
Proceed as for other native fields, in step two:
- Generate a new mapping template
- Click in the drop-down list in the second row, just below your column title
- The mapping window appears, check the new box "Other headings"

- Merlin asks for the table and field name. By default, the input field contains the column title in the file. If you've given your column title the name of the dot table followed by the name of the field, you just have to validate, otherwise you'll have to enter this information following this syntax: tablenamewithwithoutprefix.fieldname . Don't forget the dot, don't add a space, respect the case (upper and lower case).
- Validate.
- Check one of the two boxes telling Merlin to process this column when creating new items (or declination or category), or when updating.
You have the choice between creation and update or creation only, which meets 99% of needs.
If, however, you absolutely wish to work differently with this type of data (update, but not create), this is still possible with the traditional method of:
- Duplicate the task so as to have one task for creations and another for updates .
- In the second task, duplicate the mapping template to differentiate between them (to be able to check or uncheck custom field columns independently)
- Cocher à l'étape 3 l'option permettant de remplir la colonne "Statut" avec "Existe" ou "N'existe pas" et filtrer sur cette colonne pour retenir selon la tâche soit que le items à mettre à jour, soit que le items à créer.
Depending on the destination table, or more precisely on whether it's a base table such as product, product_shop, product_lang, category_lang etc... or a secondary native table, or even a non-standard custom table, Merlin may or may not offer a choice of different ways of importing data.
The reason for all these possible options is that each non-standard table can have a different structure to another, a single or multi-column context, with or without index, with or without unique key, single-column or multi-column unique key, be sensitive or not to PS context (single or multi-shop), presence or absence of one of the basic keys (identifier for products, variations, store, languages, categories, suppliers, etc.). And depending on this structure, protection against the creation of duplicate values will differ: 
Options:
- Single values without deletion: in each cell of this column, a single value is provided. It is imported without prior deletion by Merlin of any other existing values. This does not mean that there will be no value replacement; this may be the case if the table contains a "unique" type index on this field.
- Unique values and elimination of multi-column duplicates: in each cell of this column, a single value is provided. Merlin takes the set of "free" columns imported into the same table and first deletes rows containing the same set of values as those imported.
- Single values and deletion of current non-empty rows: in each cell of this column, a single value is supplied. Merlin starts by deleting from the table all rows already containing a value in the field mapped to this column.
- Value lists without deletion: in each cell of this column, a list of values is provided. The list is imported without prior deletion by Merlin of any other existing values.
- Lists of values with deletion of duplicates found in this column: in each cell of this column, a list of values is provided. Before importing this list, Merlin deletes any existing rows containing a value in common with any of the values in the new list.
- Lists of values with deletion of current non-empty rows: in each cell of this column, a list of values is provided. Merlin begins by deleting from the table all rows already containing a value in the field mapped to this column.
You'll have noticed that among these options, some allow you to import not one value per cell, but a list of several values.
Imagine that your field is intended to receive, for spare parts, the models of compatible cars. For some parts, you'll need to import several different model names, so you might as well do it all at once, using a list.
In the file cell, all you need to do is insert these values, separated by the list separator defined in step one, which defaults to a comma. You have an example above, in line 3 of column CO of the displayed file.
Continue by mapping the other columns of the file in the same way.
Import of standard native headings not managed by Merlin
The appeal of this new feature is broader than you might think. The adage "who can do more can do less" applies here. If we can import in this way into custom fields you've added to the database, we can also use it to import into standard or native PrestaShop fields, but which Merlin doesn't handle natively. Some examples:
- The #RGB color of attributes.
- The address of suppliers.
- The description of brands.
etc...
The method is strictly the same. Let's imagine that tomorrow PS releases a new version, having added a new public_price field to the product and product_shop tables. Add two columns to your table, product.public_price and product_shop.public_price, link them and you're done, without having to wait for the next Merlin update. Magical, isn't it?
Whatever the field type, the rest is unchanged for steps 3, 4 and 5, and eventually planning without a CRON task. If you've never done an import with Merlin Backoffice, we refer you to the basic PrestaShop import tutorial.
At step 3 in particular, note that all the hyper-powerful tools like MagicEdit and MagicFormula also work on this column type. There are almost no limits...
With a little imagination and a good grasp of this new tool, you'll be able to perform previously unattainable imports, such as import product lists into packs and why not the data from the customization fields we told you about at the start of this article, without a single line of PHP code or sql query. Don't hesitate to share your experiences of this type in our forum, with other users of this module.
Category's other articles Import into PrestaShop database
-
Importing attribute declinations into PrestaShop
Video
How to
Importing attributes and declinations into PrestaShop explained in images and video. Two methods, including the Merlin method, are presented and compared to ensure a successful import
-
Categories synchronisation key
Guide
How to configure the categories synchronisation key to successfuly import with Merlin Backoffice
-
How to import new attributes, suppliers, features
How to
Tutorial showing how to easily and rapidly import new attributes, suppliers, manufacturers and features into PrestaShop without creating new products or new variants, using PrestaPricing
-
Importing product packs into PrestaShop
How to
Step-by-step illustrated tutorial showing how to import multi-product packs into PrestaShop, using the Merlin Backoffice module
-
Automated obsolescence
Tuto
Our method for automating the obsolescence of products and variations that your suppliers no longer sell or are out of stock
-
MagicFormula and MagicEdit in automatic mode during imports
Trick