Import into PrestaShop database
Importing csv, xls, xml with PrestaShop admin
There are a lot of things to complain about with this native tool:
- Process too complex.
- Plants beyond a few hundred elements. Impossible to manage large bases.
- Requested structure non-standard and too complex (e.g. format requested for attributes).
- Only handles local sources.
- Too slow and unstable.
- Too segmented, impossible for example to create categories and their content at the same time.
- Too dangerous (you can't see what you're transferring).
- Too rigid (can't do partial imports).
- No management of obsolete items, margins, default values, etc.
- Paid and expensive support.
- .../...
Merlin offers an answer to all these problems, especially on catalog import, its real specialty.
Order import:
Merlin doesn't currently support the import of orders or customers, as the usefulness of such a possibility remains marginal and very occasional (e.g. order migration from another CMS like OSCommerce, you don't do that every day). So you'll have to use the PS back office for this task. Here's how it works. See the official PrestaShop doc for more details:
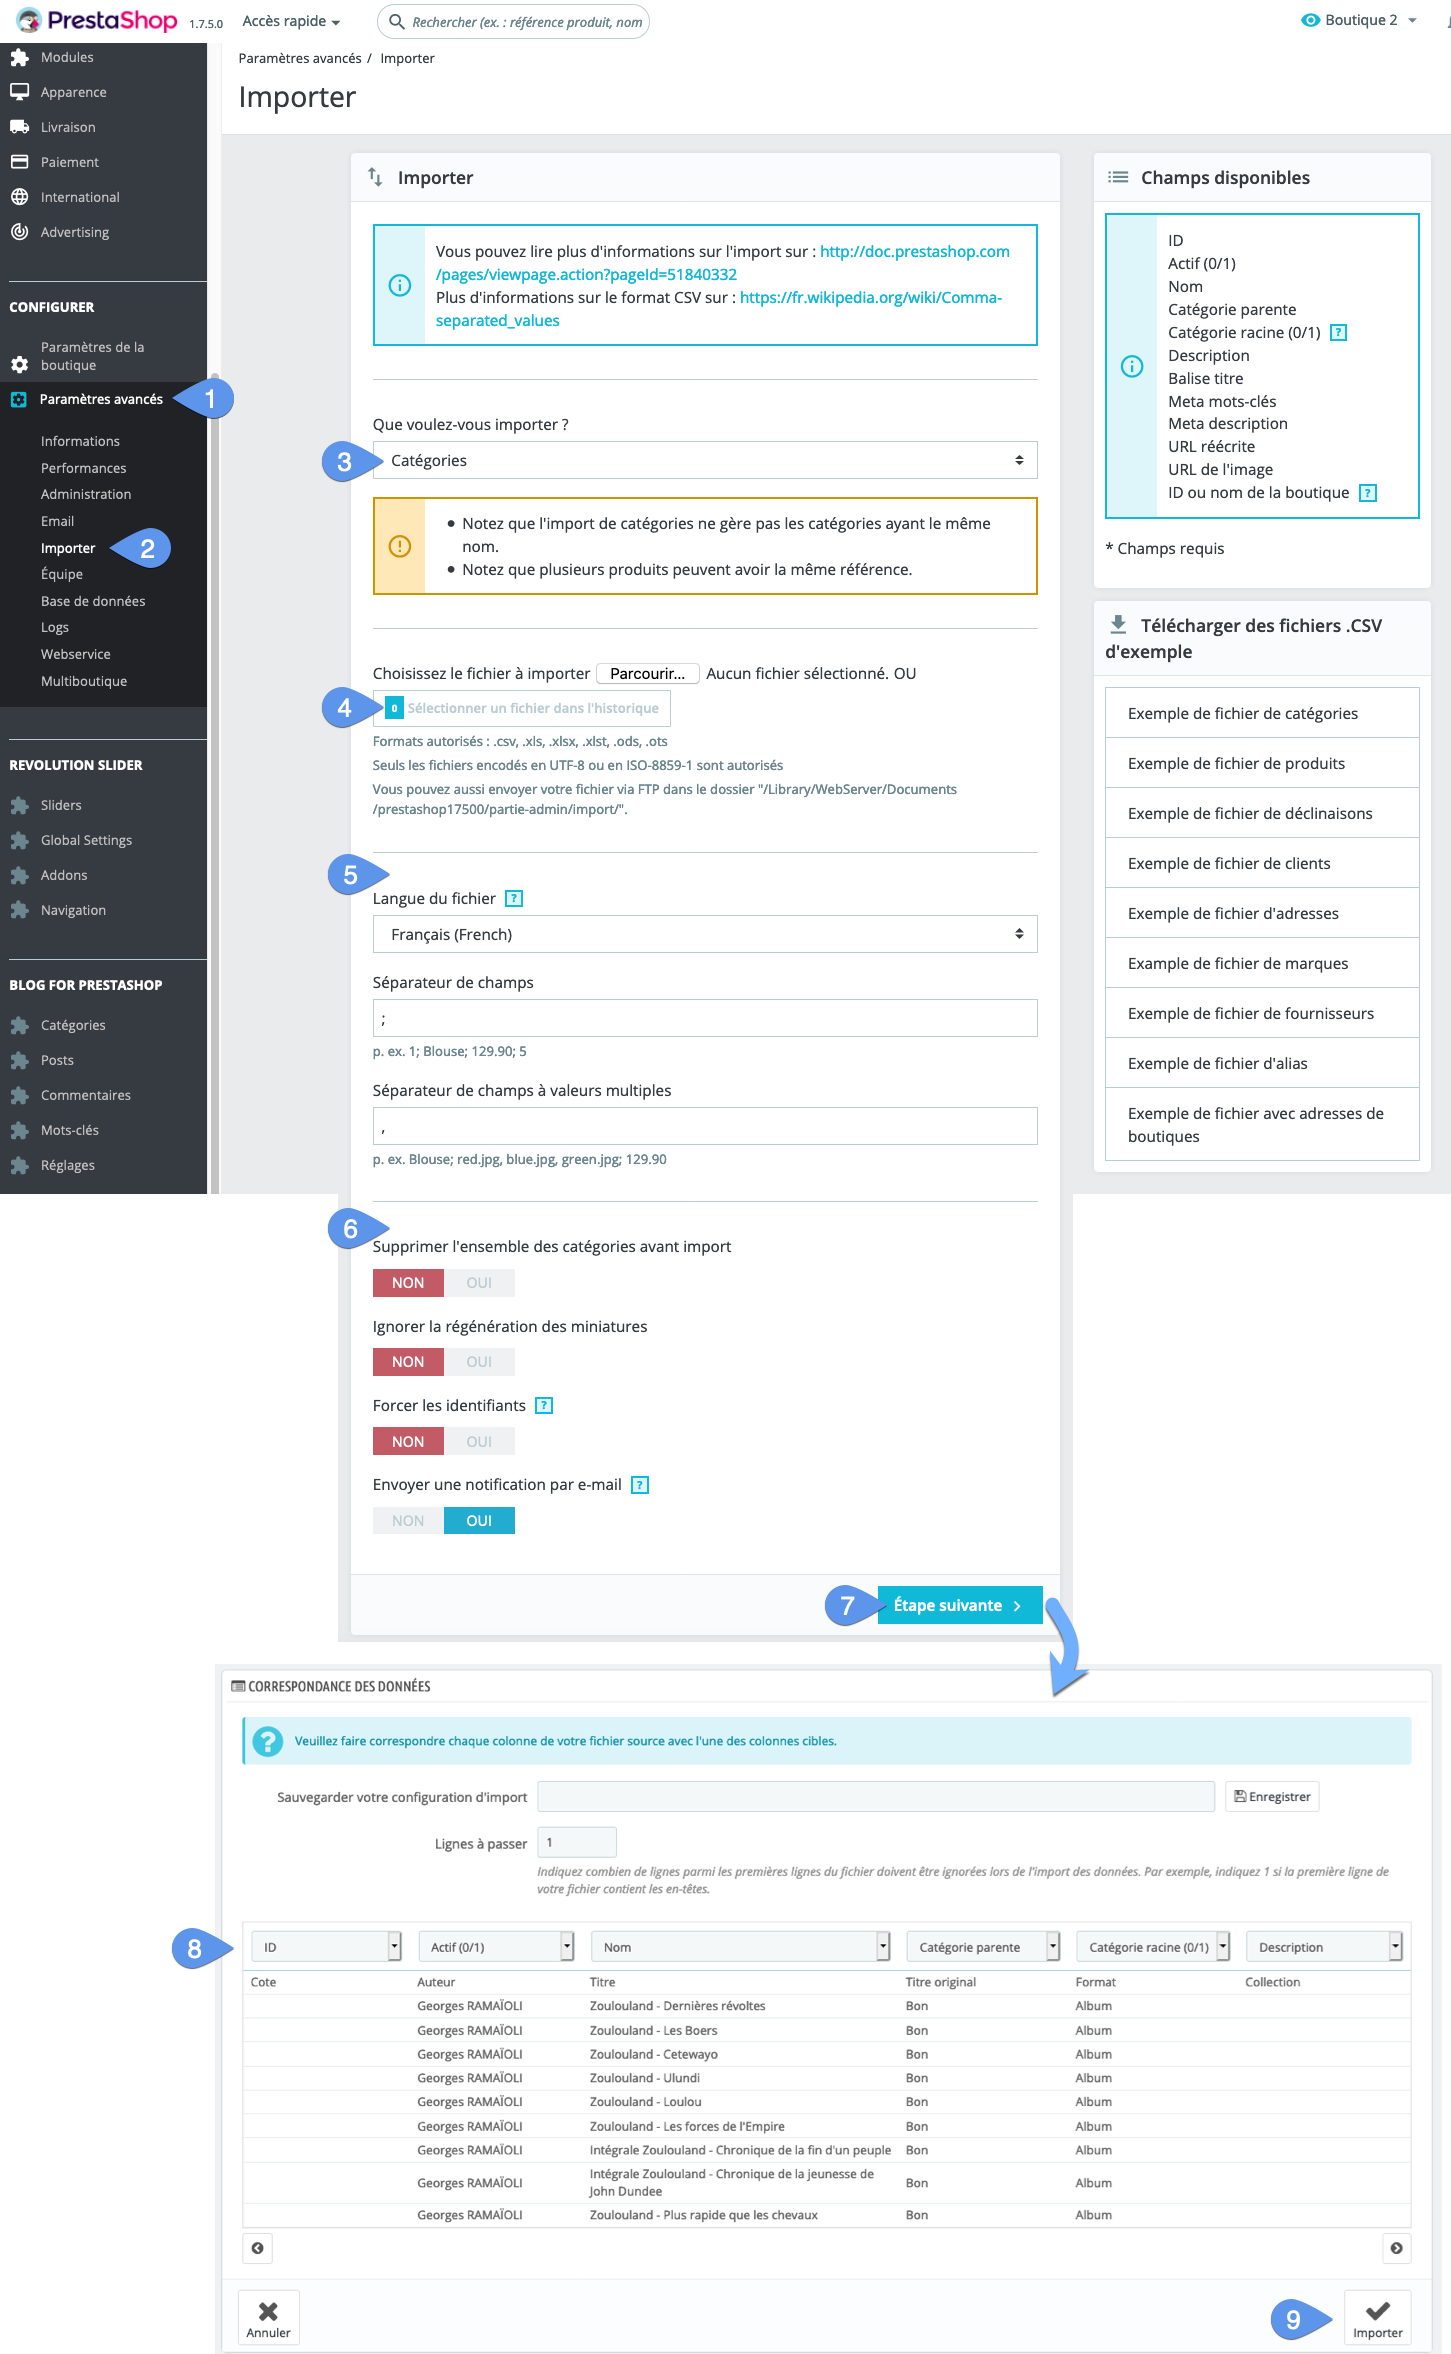
- Go to advanced settings.
- Click on "Import".
- Choose the type of objects to be processed, between:
- products
- categories
- declinations
- clients
- addresses
- brands
- suppliers
- alias
- store coordinates
- Fetch the file.
- Help PrestaShop understand how to read the CSV (it's not a standard).
- Set the few parameters suggested, such as deleting the tree beforehand.
- Click on "Next step".
- Make the mapping, i.e. the correspondence with the database fields.
- Cross your fingers and import (tip: make a good backup first).
CSV or Excel import from catalog to PrestaShop, with Merlin Backoffice: how-to video (in French).
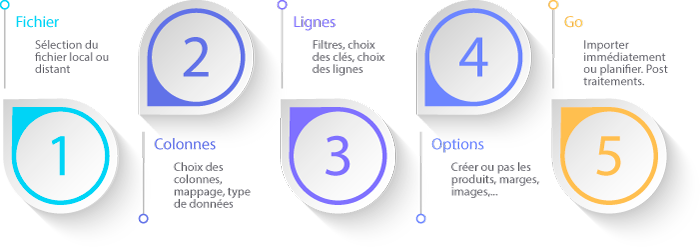
See how quick and easy it is to perform a csv or xls import with Merlin. In the first part of this video, we'll show you the 5 main steps and the main principles, such as mapping, anti-duplicate protection, choosing synchronization keys. The second part, optional for beginners, will give a quick overview of the advanced features.
To master imports and go further, such as learning how to schedule automatic imports, it will be necessary, after this "introduction", to follow the other video tutorials, also in free access or the step-by-step screenshot (the rest of this page)."
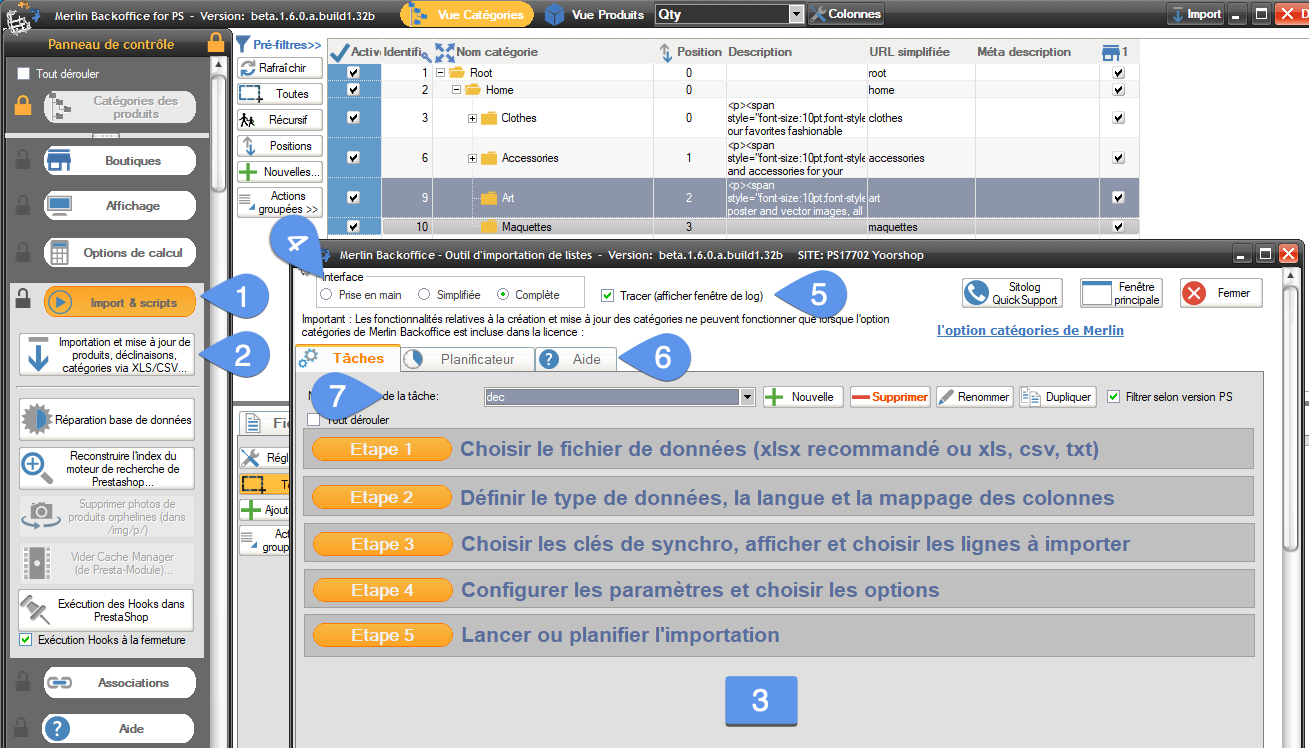
Step-by-step tutorial for importing a catalog. Let's start by opening the module
- Go to the "Import and script" drawer in the Merlin Backoffice control panel.
- Click on the tool's large open button.
- The import module opens, a tool that will guide you through 5 steps.
- The interface comes in three versions, handheld for learning only, simplified for quick and easy imports, and full which we've chosen for this tuto and which you'll use most often.
- Activating the trace is a good idea at first, it allows you to follow in an independent window (with a yellow background).
- You have three tabs, the first contains all the settings for the "Task" to be performed, the second is a scheduler (equivalent to cron tasks on a server, but in Windows software version, it's much easier to use), plus help (which will be replaced shortly by a link to this article once complete).
- To begin with, let's give a name to our scenario, entitled "Task" in this software. It contains all the settings for the page, from the choice of file to the choice of matching template and all the settings.
First step, choosing and setting up files
The document containing the items must be in .xls or .xlsx) format, either .txt or .csv text. Xml is not currently supported, but it's easy enough to convert them to xlsx with the latest version of Excel.
You can use listings supplied by wholesalers or dropshippers directly, or export from a store in another CMS, such as Shopify.
Tip: if you don't have any pre-filled data sources, it's best to use Merlin in the traditional way (quick entry and bulk editing functions) to fill in your PS catalog directly, rather than entering everything in an Excel table that you'll then have to export to the database.
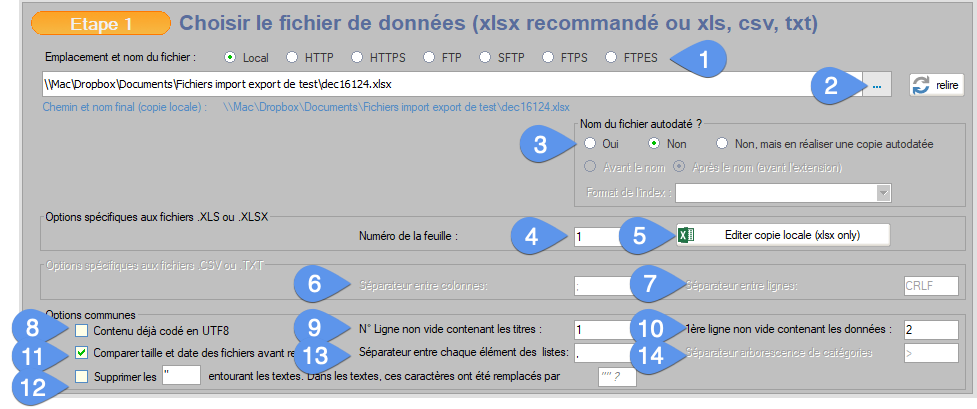
- The location can be local (on the PC or a network drive) or remote on an http or ftp server, secure or not.
- Click this button to browse a hard disk and enter a local file, or copy and paste its url directly into the input field just to the left. If it's a url, additional fields will be made visible, for entering server connection parameters.
- Note, in "Full interface" mode, the ability to manage autodated files or make autodated copies of them. Autodating is useful for always using the most recent file in a folder when it retains the same generic name.
Once you've made your selection, the software asks you whether it's a list of products (with or without their categories) or declinations. If your document contains both, you'll need to do two successive imports. - Multi-sheet Excel is supported. By default, the first sheet is imported, but you can tell the program to process another sheet.
- Merlin integrates a mini spreadsheet compatible with Excel and Open Office, allowing you to read and even modify .xlsx files without leaving the module.
- For CSV and TXT, specify the column separator of your choice.
This is usually the "tab" characters ";" or ",", but you can choose something else, such as three ";;;", which allows you to avoid confusion between the vertical separator and the ";" used in certain texts. - Also, again for .csv or .txt, specify which end-of-line separator (carriage return) to use.
The default is often RC, LF or CRLF. With other sources, enter the code in this form: Caract(10) or Caract(10)Caract(13) or Caract(10) Caract(13).
If you don't know the line break code, you can find it using the free Geany software (download from https://www.geany.org/Download/Releases). Open the file in Geany and in the display options, check "Show line breaks".
Important: The decimal separator used is the dot (.).
Even if Merlin manages to handle the case most of the time, avoid using the comma (,).
Example: 0.01 and not 0.01.
Beware, too, of text such as descriptions that may contain string ends equal to separators, such as tabs (used in tables), ";" or RC (carriage return). - A PrestaShop database is normally in UTF8 format (UTF8 General CI). If the data is in another format (such as ANSI), Merlin Backoffice must encode it in queries, otherwise accented, special or non-Latin characters would be transformed into unreadable signs.
If, on the other hand, the source is already in UTF8, you need to check this box to notify Merlin so that it doesn't perform double encoding. - Each column must have a title and a unique title.
If the titles are not at the very top, you can indicate their location here. Lines above them will be ignored. - It is also possible to indicate the number of the first line of data.
Useful when, for example, columns have a heading and a subheading, to avoid dealing with subheadings. These will be interpreted as separators and the reading will then be incorrect. - Avoid having to process a file uploaded to a server directory a second time, by comparing sizes and dates.
If the file has not been modified since the previous import, it will be ignored. - Some CSV creation tools add " around the text, which disrupts reading.
You can then remove them on reading by checking the "Remove " around text" box.
It also happens that they are not quotation marks but another character, which you can indicate here.
A 3rd advanced option can also be used to handle some rather special supplier listings in which the characters bordering the text zones have been replaced by a substitution character in the texts. Merlin will restore these texts during the import process. - Since some headings may contain lists (e.g. of images, tags, etc.), you must also specify the character separating each element. The default is a comma.
- If a column contains the tree structure from home to the product's parent category, also specify the separator used in the string (e.g. > for a string like catég1>sous_catég2>sous_sous_catég3)
File format, rules to follow:
Whether it's PrestaShop or most of the modules available, a particular format is imposed. This is not the case here, the only rule imposed is that each title must be non-empty and unique.- the first row processed will be the one made up of titles.
- It's not necessary for the titles to be identical to the field names in the database tables. In fact, thanks to the integrated mapping tool, it's possible to link each column, whatever its name, to one of the importable headings in the database.
- The order and number of columns is irrelevant.
If you adhere to the rule of non-empty, unique headings, you can include one or more (multi-value mode) series per feature (containing identifiers or values), one per attribute group (Ids or values), one for suppliers, another for manufacturers, one for tags (Ids or values), as many image suites as desired or a single or multiple series containing image urls.
The new features and values can be imported into the database.
The new characteristics and attribute groups, will be automatically created in the database, dice step 3/ reading and displaying the content. Their values can also be created at this stage, or later, during import.
Choosing the data type and choosing or creating a mapping "model":
- At the very beginning, the software asked you for the content type. You can still change your answer in step 2:
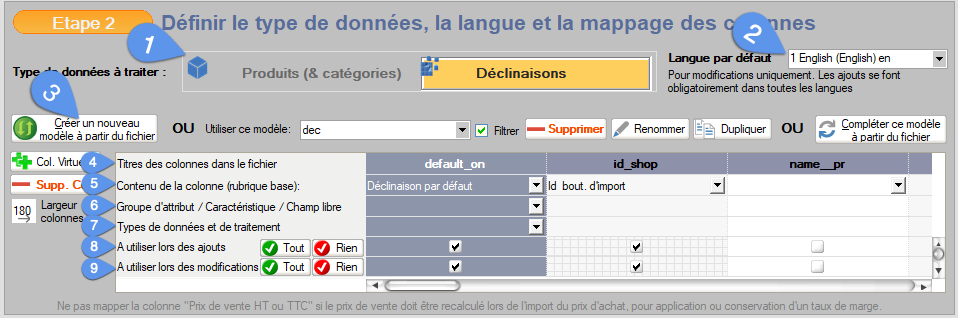
- This is also a good time to choose the import language that will be used by default (although you can also include a column indicating the language number to be used for each line independently).
- Click on this button to generate a new mapping template, or use one already created by selecting it from the existing ones.
Templates can be deleted, renamed, duplicated and modified.
Mapping template
It's not necessary to rename titles, to be able to read and manage them, thanks to the mapping tool.
The way it works is as follows (see capture above):
- The program reads the titles and adds one column per each in the template (mapping table). The 1st row of this table therefore automatically contains the title found and is non-editable.
- The second row is used to select the database heading to be mapped.
- The third and fourth are only used for certain fields, such as suppliers, manufacturers, characteristics, attribute groups or free or custom fields.
They allow you to specify, for example, the name of the corresponding group, the type of data (identifiers or values) and define the action to be taken in the event of unknown values (create or not). - The last two, "To be used when adding" and "To be used when modifying", contain checkboxes to choose which columns should or should not be considered when fully reading and filling the table and then when sending.
Only those checked will be displayed in the next step.
This allows you to use certain columns only to create new items, or only to modify existing items, or in both cases.
Columns can be deleted from the template, as well as added following a file modification ("Complete this template..." button). Updating consists in preserving the mapping of columns already present in the model, and adding and mapping new columns present in the file. These new columns are added to the existing model and appear at the far right of the table.
The choice of column to "map" is made automatically by Merlin Backoffice, when it recognizes a title. This will be the case for all columns created by Merlin Backoffice's export function (Import/Export tab in the main window). If the title is not part of the list known by Merlin, you must manually "map" it by choosing one of the suggested headings, in the mapping and quick search window that opens:
This mapping tool allows you to identify the currently associated heading (highlighted in green), quickly search for all headings containing a given word, change the association by checking a box, go back.
Note the presence of a help field explaining the role and meaning of each heading in the PrestaShop database, ideal for beginners with this cms.
The window can be left open at the user's discretion, allowing all columns in the template to be mapped in a single operation.
Some headings also require you to specify the type of data being read.
For example, to specify whether cells contain identifiers (Prestashop numbers) or real values.
For example, to specify whether cells containing the sales prices of declinations are exclusive of VAT or TCC, and whether they are the full price or just the price impact added to the sales price of the parent product.
Items marked with a star * cannot be imported (do not exist in the database or are not yet managed by the tool). They will therefore be ignored, even if they are visible. For example, the heading "unit price" does not exist in the Prestashop "product" table. It's the "unit/price ratio" value that's saved, the two being linked by calculation.
Another example, you won't be able to save the tax rate of a product directly, but the identifier of this tax (ps 1.3) or of the tax rule group (ps 1.4+).
Virtual columns
An advanced feature you won't find anywhere else: a virtual column that doesn't exist in the document supplied, but which can be added to the template, mapped like the others, and in the next step filled in either manually, by copying and pasting from a spreadsheet, or through the use of MagicFormula (this is referred to as a "calculated" column).
Their contents will then be imported like the others.
Examples of use: margin rate calculated according to your own formula, quantity filled with 0's or 1's by calculation.
Export to create a template
We're often asked if there are any template files. The question is logical, but doesn't really make sense here, as any type is suitable. To create a template of your own, customized to your needs, the best thing to do is to display a few elements in the main window, with the properties of your choice, then click on the "Grouped actions" button and choose "Export".
Choose the settings that create an xlsx ready for reimport with the same tool (or csv but not xml). You'll then export to an .xlsx containing the headings you've chosen, with titles automatically recognized by the tool, which will map them automatically.
Some properties not to forget to export depending on the case: product Id, declination Id, default category Id or name, series of characteristics and attributes, tree structure, associated families (ids), url of all images, simplified url, references...
Article category headings
When creating new listings, remember to include their default category.
This can be the identifier, but also the name or the complete tree structure from the Home category (without including "Home").
Merlin Backoffice is able to create missing families on the fly. A minus sign (-) in front of an identifier allows you to break the association with a specific category.
Please note that products are automatically made visible in their default family.
The default category of a product, as well as its default supplier (an important notion with PS 1.5, as the same product can have several suppliers, with a distinct supplier reference for each), can be either the one chosen in the default value block, or a specific value for each line by including the appropriate columns.
Multi languages
Please note the language of the content, for translatable headings. The import is done in the default language defined in step 2, except when you include the column mapped to the identifier of the language to be used, which allows you to specify the language individually.
If the language is not indicated foreach series, please use a listing containing the text headings in the default language only.
If, for example, your Excel table contains the description in English and the default language is language id 2 (French), the script will replace your French translations with the English version of the descriptions, unless you specify to use id 1 in the language id field.
Summary, tips for successful mapping:
- An export with the headings you wish to process results in a self-mappable template.
- Start by clicking on the "Create a new template..." button.
- Give it a name, then fill in the mapping table.
- Indicate for each column, whether or not it should be processed and in which case (creation or update).
- To be imported, it must therefore both be mapped and checked at least once.
- The template created in this way is automatically saved when you change stages, to be reused, modified, duplicated etc....
- As many templates as required can be created, for example one per supplier.
- Templates can be deleted, duplicated, renamed and updated.
- Avoid reusing a template for another purpose without duplicating it first.
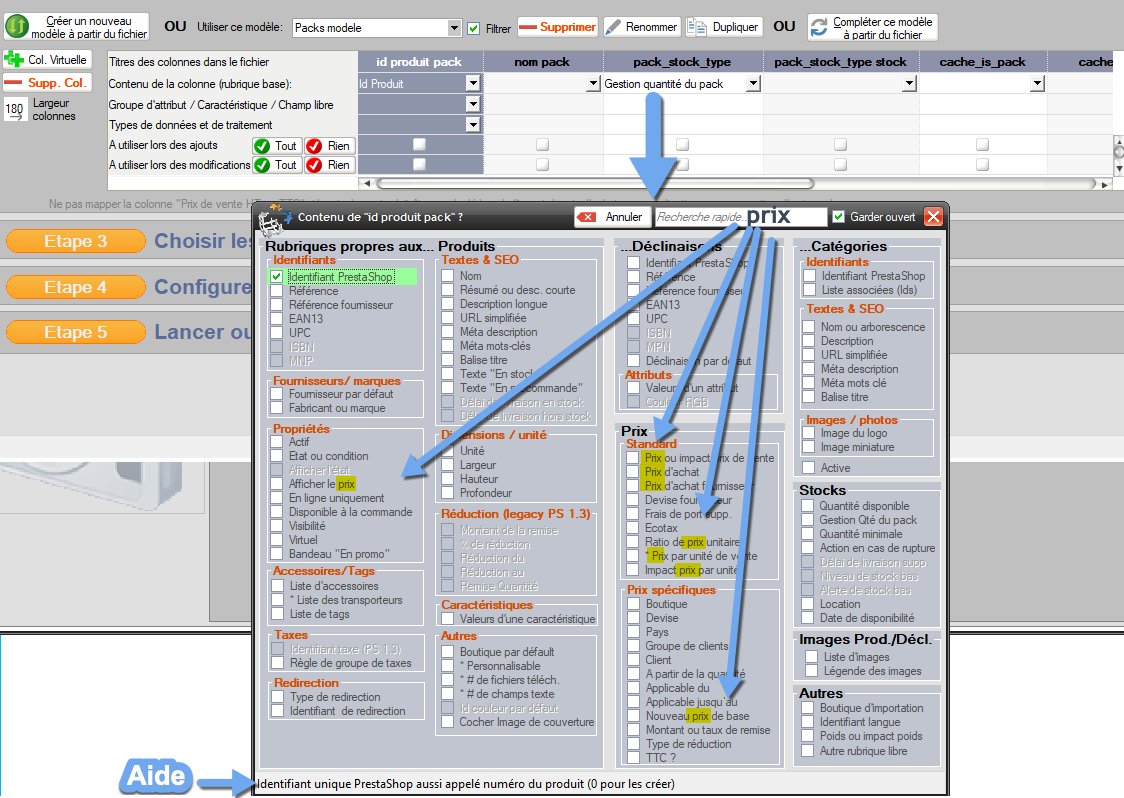
Step 3: choosing synchronization keys. Read and display content. Indicate the lines to be processed
-
Synchronization keys, an essential concept
A key is the heading that identifies an element in the database for sure. This allows Merlin to know whether the item exists and needs to be updated or whether it doesn't exist and needs to be created from scratch.
The values for the chosen key must imperatively be unique for all items.
You can choose between PrestaShop identifiers, reference and supplier references, ean13 and upc barcodes.
As a last resort (not recommended), for products, you can also synchronize on their name.
For declinations, it's also possible to synchronize them directly on attributes.
For categories, the choice is limited to the identifier or the name (or path containing all or part of the parents).
In theory, it's recommended to choose Prestashop identifiers (id_product and id_product_attribute) as synchronization keys (as identifiers are by definition unique). But this is rarely an option, as the catalogs supplied by wholesalers never contain your own Prestashop identifiers.
So in most cases, you'll choose reference or supplier reference or ean13.
To create new variants, be sure to include an enumeration containing the parents' synchronization key.
It is in fact mandatory to specify to Merlin Backoffice which product the variant to be created must belong to. A new variation will be created in the database, when the value of the synchronization key does not correspond to any existing one.
If the parent product cannot be identified, the combination created will be "Orphan".
The choice of the family syncho key is also essential when creating new items. If this category could not be identified, the product will be created, but orphaned, as attached to no family by default.
-
Absence of duplicates and correction
Except for identifiers, you'll need to ensure absolute uniqueness of the values used as keys, for all items already existing in the database.
Merlin will assist you in this task: if the box "Create non-existing prod.../declin..." is ticked at step 4, Merlin Backoffice checks the uniqueness of the keys before proceeding. If duplicates are found, you will be prompted to correct or delete them.
A button allows you to manually run the duplicate check and, if necessary, open the cleanup window.
Although it is possible to skip this step, it is strongly recommended not to continue the process until this cleanup has been performed (major risk of creating further duplicates, or even modifying the wrong items).
It is not possible to modify a value and use it as a synchronization key at the same time. Instead of modifying it, the program would create a new item with the value of this key.
-
Preliminary verification of object existence
"After reading the file, indicate whether the items exist" is recommended. Although it lengthens the process a little, it provides good visibility of new items to be created and those to be simply updated.
-
Mix of simple products, declined products and attributes
Expert options allow you to automatically manage catalogs combining products and combinations.
Override declination rows to manage the parent product only once.
Override rows that only concern the product.
For more details and to learn how to master these features, see their help bubble and our video tutorials.
-
Fast import of attributes, features, suppliers and brands.
The choice "All at once..." allows you to import these elements as soon as you perform the next action (read and display the content).
The advantage is that you can quickly save this information, without having to import any items.
Click on the "Display content" button.
If attribute, characteristic, supplier or manufacturer (brand) suites exist and are ticked, Merlin Backoffice will, depending on the options chosen, either immediately create all the characteristics and attribute groups present in these fields, as well as the new suppliers and manufacturers, or do so later, during complete processing.
Please note: Elements created in this way are created under the same name in all languages. You'll need to think about correcting their translations at a later date. These new elements will appear in red in the table when they have yet to be created, and in green when they are newly created.
-
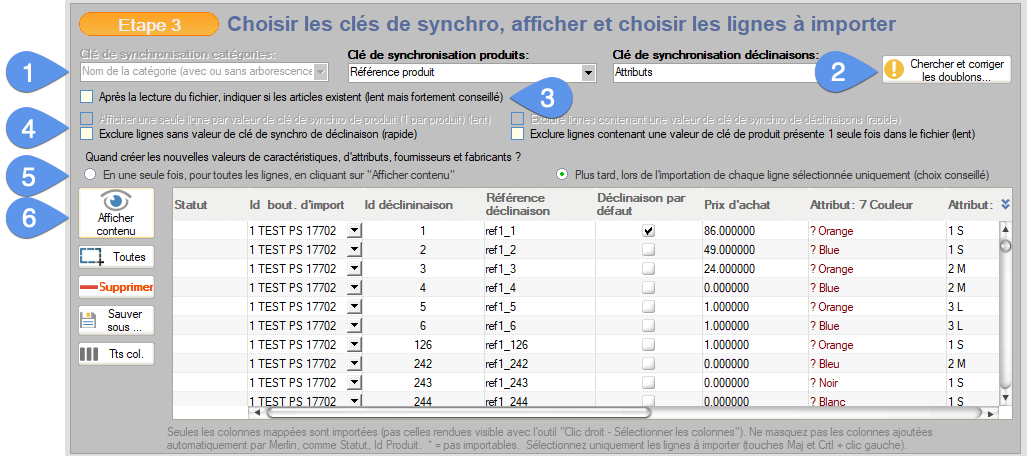
Reading and displaying content
Mapped and checked headings are read and displayed, along with their contents.
Other columns are mandatory and will be displayed even if you haven't mapped them. This is the case for "Status", "Product id", "Shop id", "Dec. id". Never hide them when Merlin itself has decided to display them.
There are different cell formats: simple text or numbers (e.g.: name, price,...), true/false (virtual/not virtual), drop-down lists of pre-defined values (e.g.: choice of store, tax rule, suppliers, . ...), cells containing the identifier (or a ? when unknown) then a space followed by the value (e.g.: attributes, characteristics,...).
You can modify the values displayed (and then imported), individually or with the mass modification tools. These modifications, made on-screen, are not saved in the csv or xls document.
The use of MagicFormula is preferable to MagicEdit, as its action can be memorized and automatically re-applied each time the content is re-read.
Filtering, selecting, hiding the unnecessary...
Once the catalog has been read and displayed, before importing into the database, you must select the data to be processed by selecting the lines to be imported (using the Shift or Crtl keys). Lines that are hidden or visible but not selected will be ignored.
It's also possible to automatically hide items, by setting up filters.
To filter: right-click in the table and choose "Filter on this column".
Filters are stored in the "tasks" database and can be automatically reapplied when you change tasks (by checking "auto").
This also makes it possible to use these filters automatically when running scheduled tasks.
While it's best not to map (or tick) unnecessary info, it's also possible to hide or display it manually after reading the file. To do this, right-click and select "select columns". However, this method should be avoided, as it is not stored in the task.
Interesting to know: the greater the number of imported fields, the longer the processing time.
A large number of parameters do not need to be specified, as Merlin will apply a default value to them. Examples include: "Available" for sale (true by default), "Out-of-stock action", minimum quantity which is 1,...
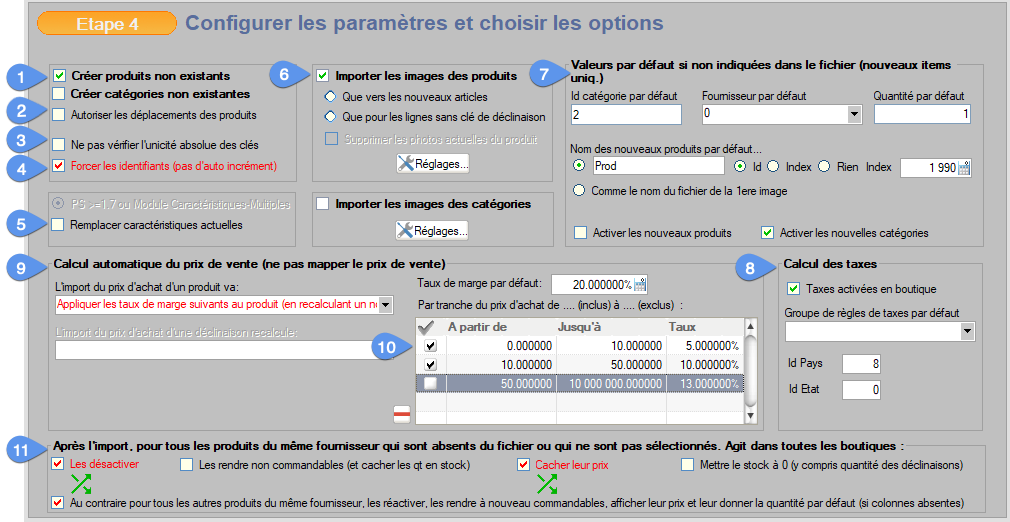
Phase 4, settings and options
This import module includes many advanced features to handle even the most complex needs.
Don't be scared though, most of the time you won't even touch these multiple possibilities, as the default settings are suitable for the majority of cases.
At first, choose the "Getting Started" or "Simplified" mode, to hide anything "optional".
-
Create new features
To enable the creation of new listings, check the "Create non-existing products" box.
A new product will be created in the database, when the value of the synchronization key does not correspond to any existing product.
In "Attributes" mode, the title of this checkbox becomes "Create non-existent declinations" and works in the same way.
Also authorize the creation of new branches if required.
-
Move
If enabled, when the default category indicated, either by its number (Id) or by its name, is different from the product's current default category, it will be moved.
In multi-shop mode, the default category is independent for each store. If you don't specify the store (by including a column mapped to the Shop Id heading), the move will be made to the product's default store.
Versions prior to 1.6: please note that the product will remain associated (visible in the store) with its old default category and is not automatically associated with its new default category. This can be achieved by including another column containing the number of the new category and mapping it to "List Id associated categories".
If you activate this mode by just indicating the name of a new category, which doesn't yet exist, remember to also check the option allowing the creation of categories, otherwise the product will be moved to the category defined by default in the block on the right (often the Home).
Moving products is only possible if your Merlin license allows category management, and only in creation mode if it doesn't.
Moving products will not be carried out if you fail to include either the id or the name indicating in which category to move the product.
-
Do not check absolute uniqueness of keys
.
Use with extreme caution, NOT checked by default.
When this option is disabled, every import begins with a check that every existing item has a unique value for the chosen synchronization key.
In addition, the item corresponding to this synchronization key will be declared as a unique key in the database. It will then no longer be possible to create products with identical values for this heading. All this is to ensure that queries will always modify the right item.
However, this constraint is sometimes annoying, as all it takes is for the database to contain a duplicate, and not necessarily on the items to be updated, for the program to be stopped.
If you activate this option, this check will no longer be performed, and the program will be sent even if there are duplicates in the database.
But in this case, it is possible that there are several elements corresponding to the search criterion. For example, several records with the same name or reference. Only one of them will be modified, but you can't know in advance which one (the first one found by the SQL query, normally the one with the smallest id, but not necessarily).
This is a major potential source of error. It is therefore your responsibility to check that the elements to be updated have a unique key value.
-
Forcing identifiers
Leave this box blank so that Prestashop identifiers (numbers) are automatically generated by PrestaShop (by incrementing the last id created).
This is the default method and the one widely recommended to avoid integrity errors (same id value on two distinct elements), and above all to avoid mistakenly replacing an existing object.
If you check this box and the id column contains a positive value, the program will attempt to assign this value as the id of the object created.
If the cell contains 0, a negative value or is empty, the normal auto increment mode will be used.
If an item already exists under this identifier, and the sync key is the identifier, the existing item data (name, description, prices...) will be replaced by the imported data.
There is therefore a very high risk of making mistakes. If you're new to exports/imports, we really recommend that you don't activate it.
-
Replace current features
Displayed only if PrestaShop is at least version 1.7 or with older versions when using a module like "Multiple Features" from our fellow Presta-Module.
There are three equivalents on Presta Addons, all three supported.
This type of module changes the behavior of Prestashop 1.2 to 1.6 by allowing a product to have several different values for the same feature (default behavior with PS 1.7).
By default is unchecked: Merlin Backoffice will then allow these different values to be saved and added to existing values. However, if an identical value already exists, it will not be added a second time to the product (duplicate protection).
If you check this option and have only one column per characteristic, the software will work as if the "Multiple values" feature were not activated. Merlin Backoffice will then start by deleting (no going back) all values already assigned to the product for each feature instance, before importing the new value. In the end, the product will have only one value for this feature. This is the case even if the file contains the same product several times (the value of the last occurrence will be retained).
Note also that if you have several series of the same group, your choice will have no effect, checked or unchecked. As many values as columns will be added (no duplication of the same value, however).
Note: this does not remove values from other groups, when they are not present.
-
Add images
- Check to allow their download.
- Keep "Only to new articles" checked, which allows images to be sent only to new articles, thus avoiding duplicates in older articles.
- The second option allows you, during the first phase (creation of parent products), to ignore images present in their variations, when you know you'll be processing them during the second phase (creation of combinations).
- You can also request the prior deletion of all current photos of updated elements.
- The "Settings" buttons, give access to all settings concerning image transfer, protected ftp or http access management, anti-duplicate protection, automatic captions (alt tag).
-
Default subsitution values
This set allows Merlin to make a decision when the necessary information is not provided by the file or not displayed in the table. Enter, for example, the destination category number or the default supplier.
For example, if the default category is not specified in the table, new products will be created in the category defined in the "Default category id" field on this tab.
Similarly, if no quantity is specified in the table, they will be created in the quantity entered in this tab.
If no name is specified in the table, Merlin Backoffice will create a generic one automatically, from the contents of these fields.
For example, names can be built up from a common prefix, followed by the product number or the value of an auto-incrementing counter.
Finally, the program can be asked to activate new creations by default.
-
Calculation of sales price excluding VAT from VAT (calculation and removal of VAT)
If no tax rule is specified in the table, items will be created using the tax rule pre-selected here.
The price excluding VAT, if it is to be calculated from a price supplied inclusive of VAT, will be calculated using the country and state tax defined here.
-
Selling price calculation from purchase cost (margin management)
5 possible modes:
- Do nothing (no impact on selling price). Margin rate may change.
- Start by calculating the current markup between the current purchase cost and the current selling price of the product then, after modifying the purchase price with the imported value, recalculate a new selling price excluding VAT to keep the same markup.
- Conserve in addition the current mark-up rates of existing variations of imported products.
- Define a new margin rate for the product, then let the software automatically calculate the sales price excluding VAT to achieve this target.
- Apply this same new margin rate to all existing variants of the product.
-
Different margin rates by purchase price brackets.
This table allows you to apply a different margin rate per price bracket.
Ex: apply 5% margin when the purchase cost is between 0 and 10€ excluded, then 10% if it is greater than or equal to 10 and less than 50 and finally 13% from 50% (last bracket not activated on the capture).
-
Obsolescence of items not available from supplier
It is possible to ask the program to automatically modify all items present in the PrestaShop database, from the same default supplier as the one chosen in step 4 (essential), and which are not or no longer present in the catalog or at least in the lines that have been imported.
4 actions are possible, which can be combined with each other:
- Deactivate obsolete items.
- Make them non-orderable (and hide stock quantities).
- Hide their selling price.
- Set their stock to zero.
Inversely, by ticking "On the contrary...", when these same records reappear in the listing of the same supplier, you ask Merlin to reactivate them, to put them back on sale, to display their selling price again and finally to re-import their quantity if this data is provided.
Be sure to read the usual precautions in the help bubble, as in the event of mishandling with these advanced options, it is possible to accidentally deactivate all the items in the store.
Execute immediately or schedule.

- You can now start sending by clicking on the "Import lines..." button.
The program will update existing items and create new ones (if creation is allowed). - Check to automatically refresh the main window display after each import. To save time, it is advisable to leave unchecked.
- Check this box to have Merlin ask PrestaShop to execute creation and update hooks on created or modified objects.
Hooks are scripts that allow predefined actions to be executed, such as updating the cache, synchronizing an external database... see PS documentation for more information.
WARNING: this can greatly slow down the procedure. We recommend that you leave this hook execution unchecked here, and instead run the hooks when you close the application. - "Then re-index PS search" allows you to launch the partial reconstruction of Prestashop's search engine index.
You can also perform this action manually later from the main window's side control panel.
WARNING: this can also noticeably slow down the application, or even freeze it if the PS re-indexing script crashes. We recommend that you run the index rebuild before closing Merlin or from the back office. - The "Acceleration factor" slider lets you play with the speed of the whole data transfer process, by grouping more or fewer cells per query.
Set at 100% (default value), Merlin sends 32kb of data, i.e. around 3 to 5 items per request (highly variable depending on the number and content of columns), then waits for the server's response. This avoids any risk of time out or server saturation, even on an entry-level shared server.
With a factor of 1000%, the program will compile SQL queries ten times larger, until it reaches the 320kb ceiling. This won't make it 10x faster, but it will reduce the number of http exchanges (in which the encrypted MySQL requests and the server response are contained) and save time on the order of 2 or 3.
The maximum allowed is 10,000%.
Only experience and testing will enable you to determine what maximum factor is suitable for your server to get the best out of it without saturating it. - On the other hand, the "pause between 2 SQL requests" field slows down the module by inserting a timeout (in hundredths of a second) between each request sent to the server.
This setting has been added specifically for OVH customers on shared servers. This type of hosting is limited by OVH to a maximum number of requests per time unit. When this maximum number is exceeded, OVH deliberately slows down the user, even blocking the connection for 10 minutes (with a 500 error).
This is a practice we've been denouncing for years, but which unfortunately continues at this host, to the detriment of its customers.
If you fall victim to this, a value of 30 hundredths of a second should allow you to work, while losing fluidity. - It is also possible to ask the program to work in several passes, in order to process very large listings (over 8000 items), which can saturate the PC's memory.
Experience shows, however, that you should only use this option if you have concretely observed blockages in the application or in Windows.
Numerous people in fact successfully import grids of 40,000 items in a single pass without a hitch.
The absolute record to date being 360,000 lines in a single pass, on a dedicated server, at a speed of 0.04 sec/l!"
After processing, the program runs a succinct check, comparing item update dates.
Beware, this is not a complete check of each field, but only a verification that the items have been either created or modified.
The result is indicated in the 1st column ("Status").
It is then possible to sort the table according to the values in this column (right-click), to correct failures and resend them, for example. - You can also click on the "Schedule the import of this task..." button now or after you've performed the import.
Automatic or manual image transfer launch
- If requested, Merlin then proceeds in the background to launch the image upload.
- Save the data table after processing.
- Go to the main interface.
- Open the image download settings window (magnet button).
- Go to the "Sources.." tab and check "File already contains Id... columns"
- Click on the button to read an Excel containing image paths or URLs, in the "Images" tab (green button with a white grid).
- Click on the button to optimize the table (button representing a clock). -
- Check the contents, in particular the store assignment columns with PS 1.5
- Launch photo upload. They are then uploaded via http or ftp (to be configured beforehand), assigned to objects, thumbnails are created.
- Select a task.
- Then click on the "Schedule the import of this task..." button on the 1st tab of this window, or the "New event" button on the second tab.
- In this second tab ("Schedule events"), a new row has then been added to the table called scheduler.
- For each event, it's possible to define the frequency (or "Recurrence") of executions, such as daily, weekly, monthly, time interval, etc
- The big "Start execution of all active events" button launches a background process, which will every x min (interval of your choice), scan the schedule from bottom to top and launch any scheduled event whose execution time has been reached or exceeded.
- Only events checked "Active" are processed.
- If you tick here, you can save the history for each event and consult these reports later.
- You can also check "Launch automatically on startup" so that the robot runs itself each time Merlin Backoffice is launched.
- Right-click in the table headings and bring up the column "List of image paths or URLs" (and any other desired heading, such as caption, "cover photo" choice, ...)
- Open your Windows explorer, select your images and drag them directly into the table in step 3. A task per image is then added, which simply needs to be processed to create a product in the default category (or other by including the "default category" data) and receiving as its name the one defined in the settings.
- Enable the addition of photos and run the process.
- If you forgot to check off adding the photos, it's still possible to do so manually, following the procedure below:
Recurring events or automatic scheduled tasks (equivalent to cron tasks, but in Windows fat-client mode)
- This feature allows you to fully automate regular updates to your database from updates provided regularly by suppliers. It's the equivalent of the well-known cron tasks, but much simpler to set up, as it requires no cron task module and no programming knowledge of this type of automatic action.
- A scheduled task is called an "event". An event therefore consists of a "task", with the link to the document and its template, all its settings and various additional parameters such as the date of the next processing and the recurrence of subsequent ones (periodicity).
- To do this:
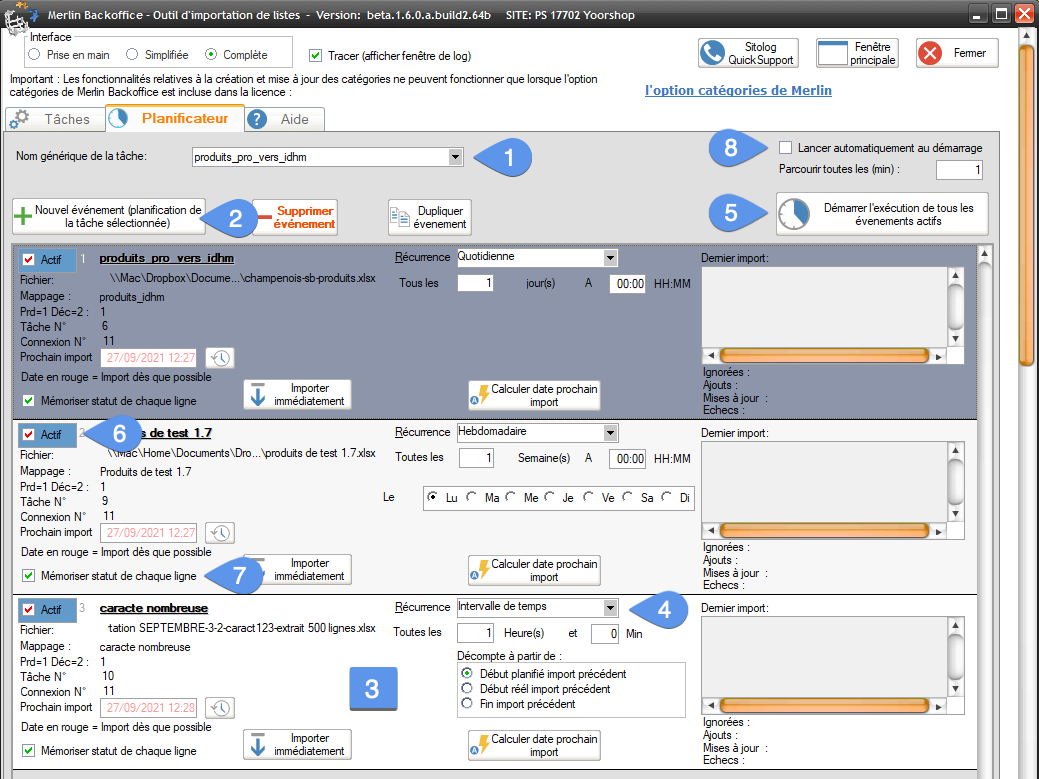
- Keep in mind that the scheduler imports "tasks". If you modify a task after scheduling it, your changes will be taken into account as of the next automatic import run by the scheduler.
- Similarly, if you delete a task, events using that task are also deleted in the scheduler.
- For information, Merlin can be launched via a command line or a Windows scheduled task, passing the connection name (the site's choice) as a parameter. Combined with the scheduler configured in automatic launch mode, it is possible to fully automate database sync from a Merlin installed on a Windows server, for example.
Fast, drag-and-drop photo card creation
- Did you know? It's also possible to very quickly create new products, from a set of images present on your computer.
- The products created will then be named with either a generic indexed name, or with the name of the images.
- This is very practical for photographers, for example, for whom a photo is a product. To do this, nothing could be simpler:
Need further help?
- Click on the Sitolog QuickSupport button in Merlin and give us a call.
- This will allow us to share your screen and interact, so we can explain how to perform the operation you're having trouble with, or check your settings. Our support is free of charge.
Category's articles
-
Importing attribute declinations into PrestaShop
Video
How to
Importing attributes and declinations into PrestaShop explained in images and video. Two methods, including the Merlin method, are presented and compared to ensure a successful import
-
Categories synchronisation key
Guide
How to configure the categories synchronisation key to successfuly import with Merlin Backoffice
-
How to import new attributes, suppliers, features
How to
Tutorial showing how to easily and rapidly import new attributes, suppliers, manufacturers and features into PrestaShop without creating new products or new variants, using PrestaPricing
-
Importing PrestaShop custom fields
Guide
How to
Introducing the most efficient way to quickly enter data into PrestaShop's custom, free, non-standard fields, which have been added to a table
-
Importing product packs into PrestaShop
How to
Step-by-step illustrated tutorial showing how to import multi-product packs into PrestaShop, using the Merlin Backoffice module
-
Automated obsolescence
Tuto
Our method for automating the obsolescence of products and variations that your suppliers no longer sell or are out of stock
-
MagicFormula and MagicEdit in automatic mode during imports
Trick