PrestaShop scenario management with N8N and Merlin Backoffice Flex
A scenario saved in Merlin Backoffice Flex can be replayed manually or automatically and programmed with the scheduler.
But did you know that Merlin also has an API that allows it to be controlled by automation or agent tools such as N8N, Zapier or Make?
And thanks to this API, you can add nodes to your workflows in these automation tools to execute Merlin scenarios or a series of bulk processing actions on your catalogue.
Let us show you how it works with some images...
Start by creating or choosing a scenario
Watch the video or tutorial if you do not yet know how to create a scenario.
As a reminder, a scenario is a sequence of user actions (clicks, keystrokes, etc.) performed in the interface, which have been recorded and can be replayed.
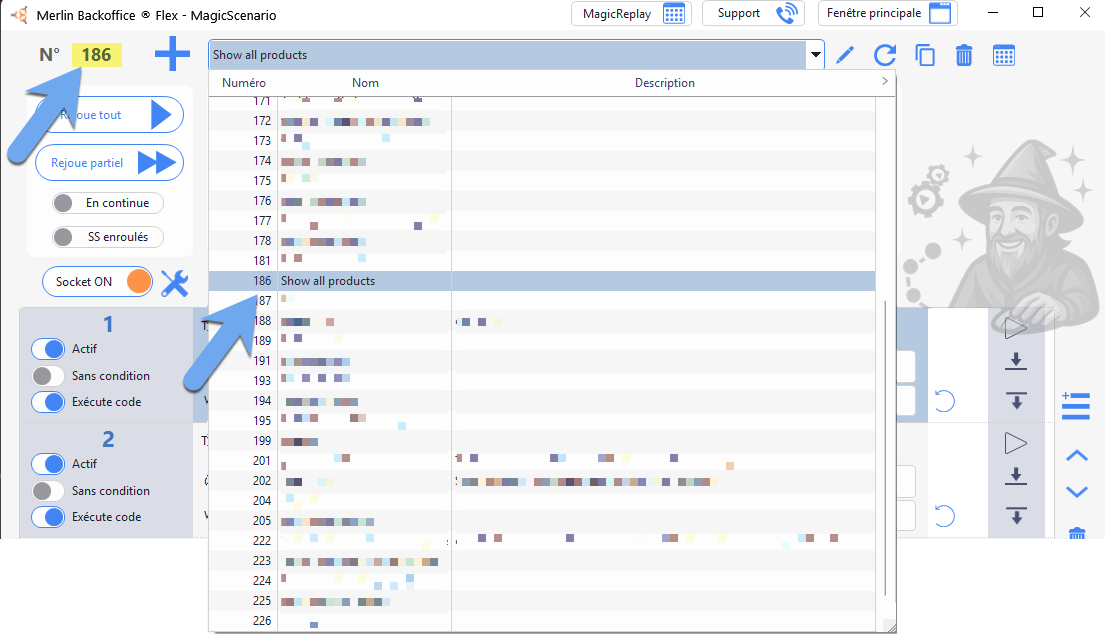
A scenario is identified by its number. You will find the scenario number in two places in the MagicScenario scenario capture and editing window:
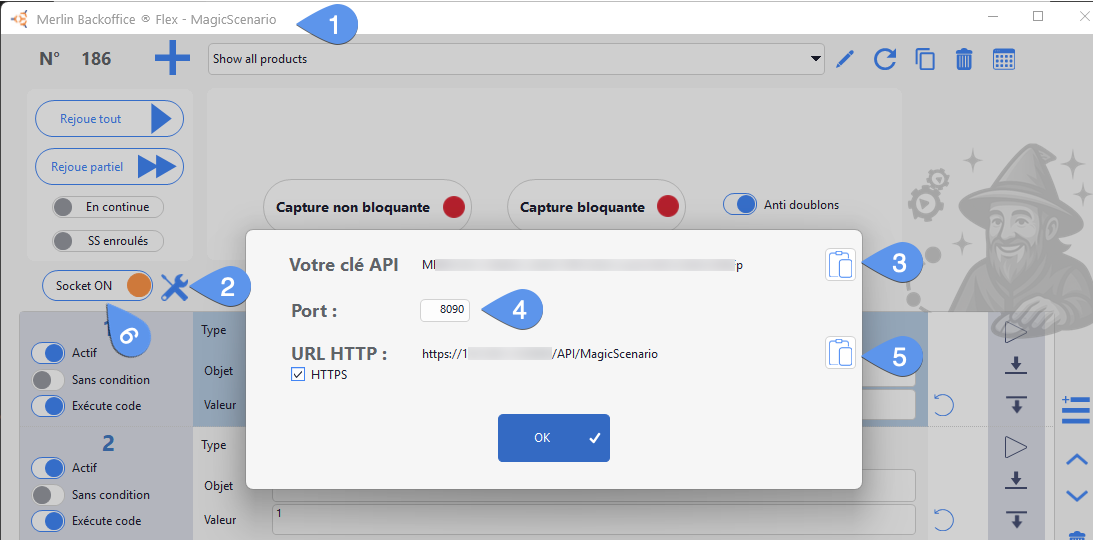
Connection settings
You will need various settings, all provided by Merlin Backoffice Flex.
- If you have not already done so, open the MagicScénario window.
- Click on the API configuration button.
- Here is your API key or token.
- Here is the port number, which you can change (recommended).
- Here is the full URL for accessing your Merlin's API.
- Check that the API is active (‘Socket ON’ switch).
Open a workflow in N8N, Make, Zapier...
Learn how to install and use these tools if you are not yet familiar with this technology. There are many training courses available online.
For this tutorial, we have chosen N8N for the simple reason that it can be installed and used for free locally on your own machine, thanks to another free tool called Docker, or on your own server (self-hosting).
A workflow in N8N is a series of boxes, called nodes, connected in a linear or conditional manner (branches). The workflow, somewhat like a Merlin scenario, can be executed from node to node, either manually or on a scheduled basis. An example of a workflow created in N8N:.
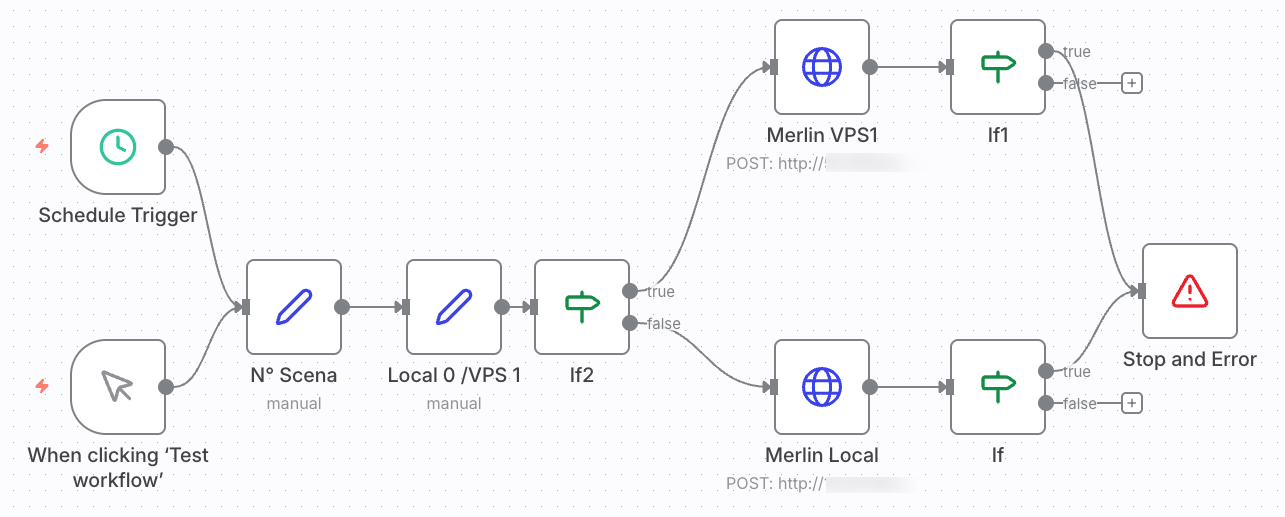
Some nodes can be connected to applications, websites, and services, communicating with them to perform actions, send data, or receive data.
For example, there are specific nodes for connecting to and controlling Excel, to the PrestaShop API for reading, creating or modifying products, or to AI APIs for creating what are known as AI agents. There are hundreds of others.
There are also ‘generic’ nodes that can be programmed to connect to applications or services for which there is no dedicated node. This is what we will use to connect N8N to Merlin Backoffice Flex and execute a scenario.
In your workflow, add a trigger node and an HTTP Request node
A workflow requires at least two nodes. A node called a ‘trigger’, which enables the workflow to run, and an action node. For this example, we have used the ‘Manual execution’ trigger.
To control with Merlin, you must use the ‘HTTP Request’ node.

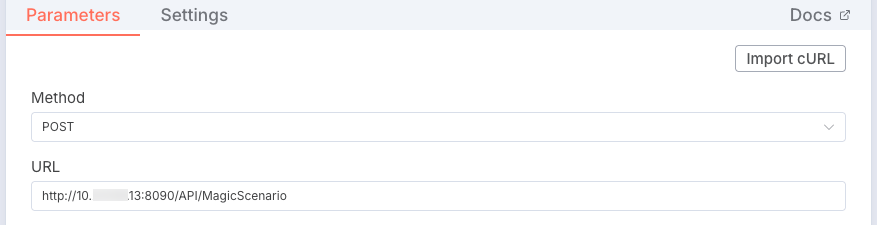
Configure it by specifying the URL used to access the Merlin Backoffice Flex API
Double-click on the node to configure it.
Set it to POST type and enter the URL provided above.
The URL is composed as follows:
- HTTP:// or HTTPS:// depending on the configuration of the workstation or VPS on which Merlin Backoffice Flex is installed.
- the IP address of the workstation
- : followed by the port number (default: 8090, which can be changed in Merlin).
- /API/MagicScenario
Which gives, for example
http://10.xxx.xxx.13:8090/API/MagicScenario
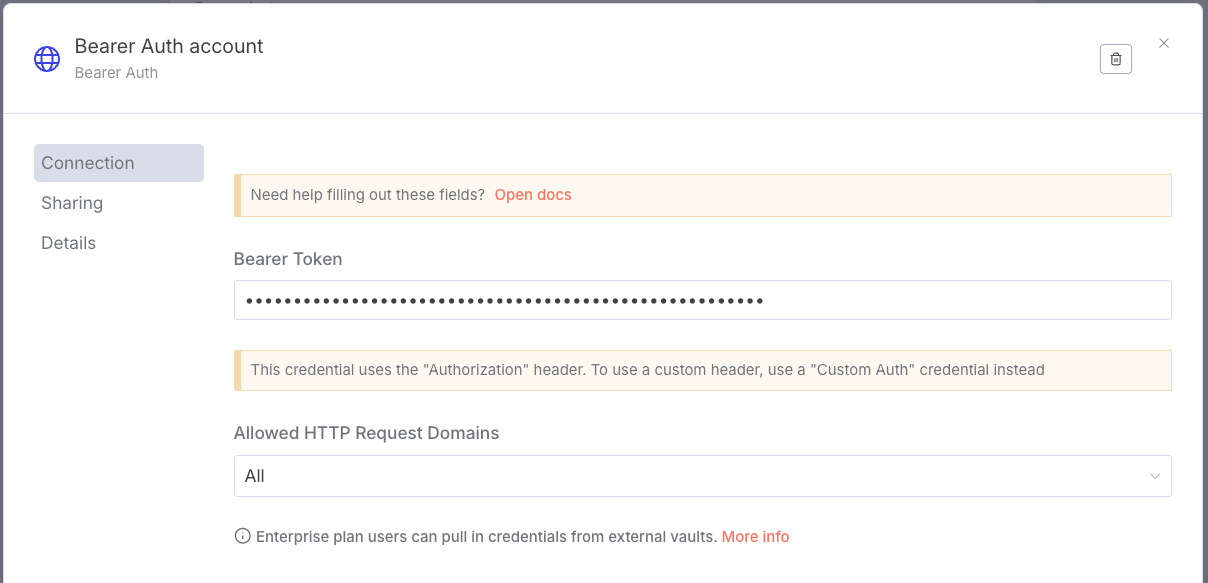
Select the ‘Generic Credential Type’ identification mode
The connection to your Merlin Backoffice Flex API is, of course, secure. Configure it as follows:

Enter the API key provided by MagicScénario
This type of identification requires a ‘Bearer token’. An identification code, if you prefer, or an ‘API key’.
Click on the pen to the right of the ‘Bearer Auth’ field to enter the API key provided by Merlin Backoffice Flex in step 2:
Tell it the number of the scenario to run
In the HTTP Request node settings in N8N, enter the number of the scenario to be executed as follows (No. 5 in the example below). The name of the “id” parameter is very important and must be respected.
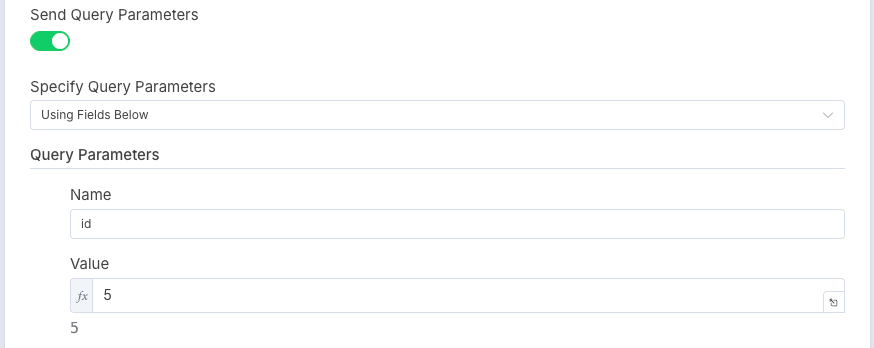
Please note that the number can also be passed as a parameter to the node from the previous nodes. In this case, you must enter a formula (fx) in the ‘Value’ field.
Example of a formula that will retrieve the number from a variable created in a previous node: {{ $(“N° Scena”).item.json[“ID Scenario”] }}
Run the workflow
To do this, simply click on the manual trigger node.
Category's other articles Automation
-
Automatisation, le tutoriel video complet
-
Command line launch
Guide
To automate the management of your PrestaShop catalogue, you can launch Merlin Backoffice Flex from the command line.
-
Installation on a VPS
Tip
Installing on a VPS server rather than locally has many advantages, which are outlined here.