PrestaShop inventory management and mass publishing
The three inventory management modes in PrestaShop
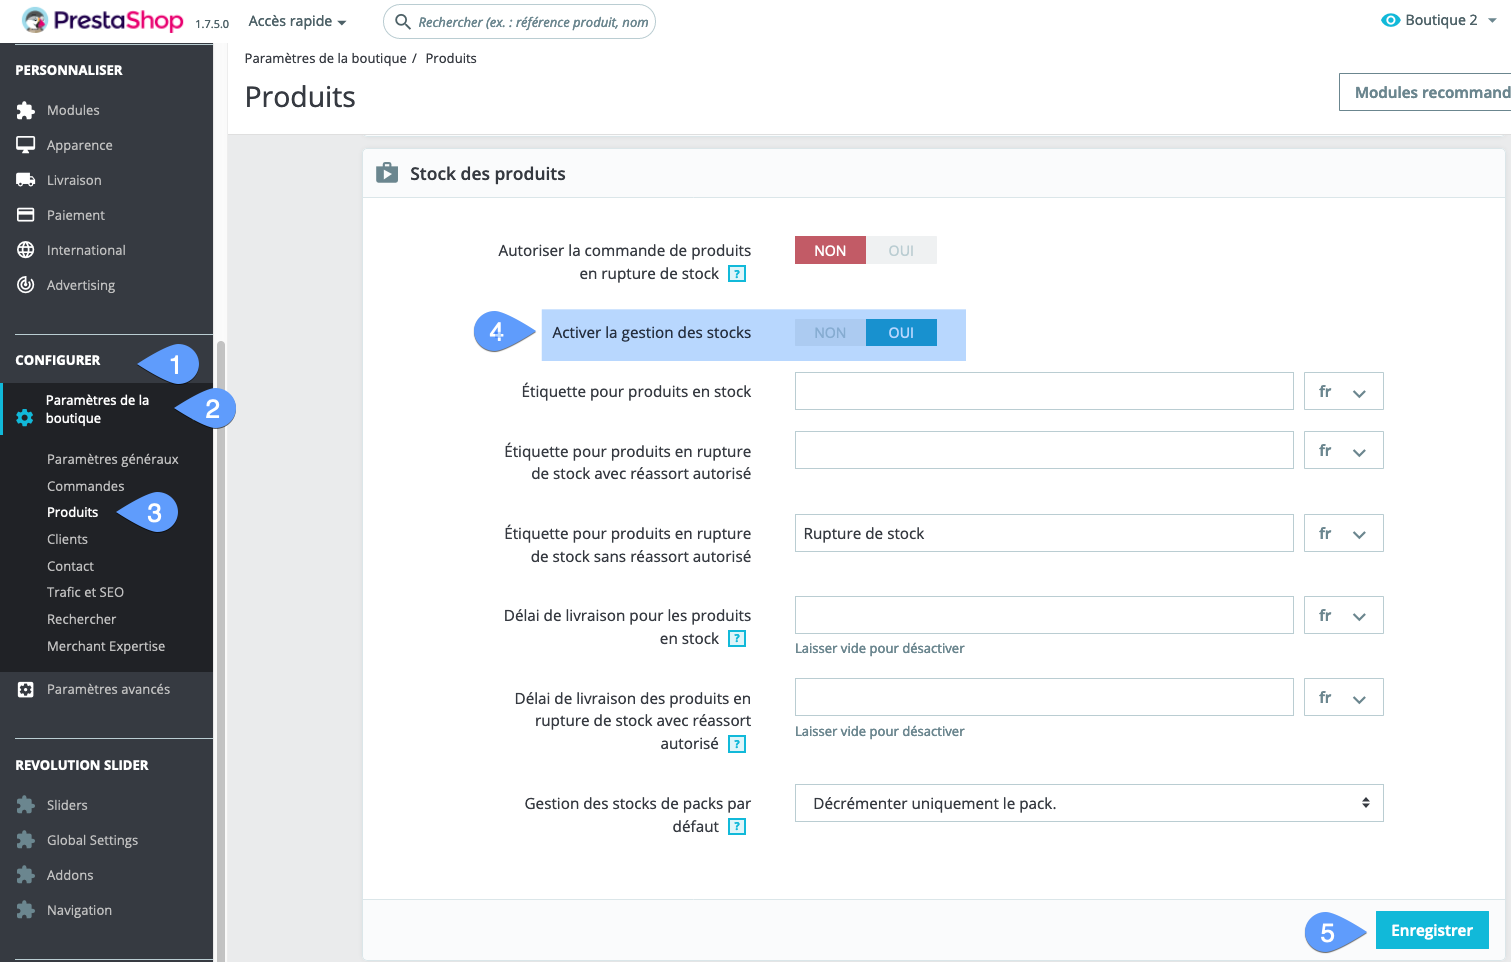
Disable or enable inventory management
In PrestaShop you can completely deactivate inventory management. In this mode, products and variations no longer have a quantity parameter. Products are therefore never out of stock.
To activate or deactivate inventory management in PrestaShop 1.7:
- Go to the "Configure" panel.
- Click on "Shop settings".
- Click on "Products".
- Down the page to the "Product stock" block, then use the "Enable stock management" switch.
- Save
Manual inventory management mode
In manual inventory management mode, which is the default mode, each product and each variation has one and only one quantity, or one stock ( in multi-boutique: per boutique or group of boutiques).
When a product has variations, its stock is equal to the sum of the stocks of its variations.
Advanced inventory management
In advanced inventory management mode, you can define several "Warehouses" and a different stock per warehouse for each product and declination.
The total stock for a product is therefore the sum of its different stocks in the warehouses.
In multi-boutiques, you can associate or not each warehouse with each boutique.
Advanced inventory management mode exists only in PrestaShop versions 1.5 and 1.6, but can be reactivated in 1.7 with an add-on module.
FAQ
PrestaShop stock management refers to a large number of different terms and notions, which can easily be confused, or which remain unclear to many people. That's why we've decided to start by providing you with a glossary, which we'll be adding to as the need arises.
This is the number of copies of the same product or variation actually physically present in your stock. Can be known from a stock inventory, or equal to your first supplier order when you start your business.
This is the number of copies of a product or variations in stock that you can't sell, because they're reserved for another use, or simply already sold but not yet shipped. This quantity is therefore the result of a calculation taking into account all current orders.
Equal to physical quantity minus reserved quantity
This is the quantity you can sell for a product, before you run out of stock. It is therefore also the available quantity indicated on the site.
This property exists for products and for each of their variations.
This is the minimum quantity needed to be able to buy a product. For example, if you sell packs of 6 liters of milk, without allowing the purchase of less than 6 liters, the minimum quantity will be 6.
This value is specific to Merlin; it tells you, by product, the quantity actually sold for the period defined in the calculation options. It is used in calculations of other data, such as "actual quantity" and "stock coverage".
This item is not stored in the database, but the result of a calculation.
Physical quantity in stock added to the quantity on order with suppliers, minus quantities in customer orders not yet shipped.
To summarize it is the quantity actually available of the product taking into account all unfinished stock movements.
This item is not stored in the base, but the result of a calculation.
From the quantity available for sale and the volume of past sales, the stock coverage is the duration in number of days, estimated before being out of stock.
Merlin also allows you to choose the time period over which to analyze the sales volume.
This item is not stored in the database, but the result of a calculation.
This is the storage area for a product, in a physical warehouse or physical stock. It can be a department number, for example.
This term is mainly used when you're in manual inventory management mode. When in advanced inventory management mode, on the contrary, we use the term "Location" to designate the storage area in a warehouse.
Allows you to define (worth 0 or 1), whether or not a product is available for purchase, regardless of whether it's in stock or not.
This has the effect of hiding the "Add to cart" button in the product's listing.
Allows you to inform your customers of the date on which a product "Not available for sale", will be available again.
Beware, the process is not automatic. On date D, the product does not automatically revert to available-for-sale status.
Three choices are available for each product:
- Refuse orders.
- Accept orders.
- Default (defined in stock management preferences, globally for the whole site).
Please note: In order to modify this item, it is mandatory that a quantity, even equal to zero, be defined for the product.
The term keeps changing, between the different versions of PrestaShop, but it's always simply the text to be displayed in the product sheet, when it's in stock or not, like "In stock", or "No longer available", or "In pre-order, delivery within 10 days". There are three possible labels:
- When the product is in stock.
- When the product is no longer in stock, but can still be ordered.
- When the product is no longer orderable.
You can set these 3 labels golablement for the whole site and customize them independently for each product.
Values 0 or 1. If it is 0, a product that is no longer in stock cannot be ordered.
The text/message/label displayed is then the value of the parameter "Label for out-of-stock products without authorized restocking"
On the contrary, if it is 1, the customer can place what is known as a pre-order. We also say that restocking is authorized.
The delivery time is then defined by the parameter "Delivery time for out-of-stock products with authorized restocking".
And the text/message/label then becomes that defined by the parameter "Label for out-of-stock products with authorized restocking"
What barbaric names :-) All these terms are specific to the advanced inventory management mode and are defined in another FAQ present in the page explaining the use of this mode in detail.
How to modify inventories in manual management mode from PrestaShop
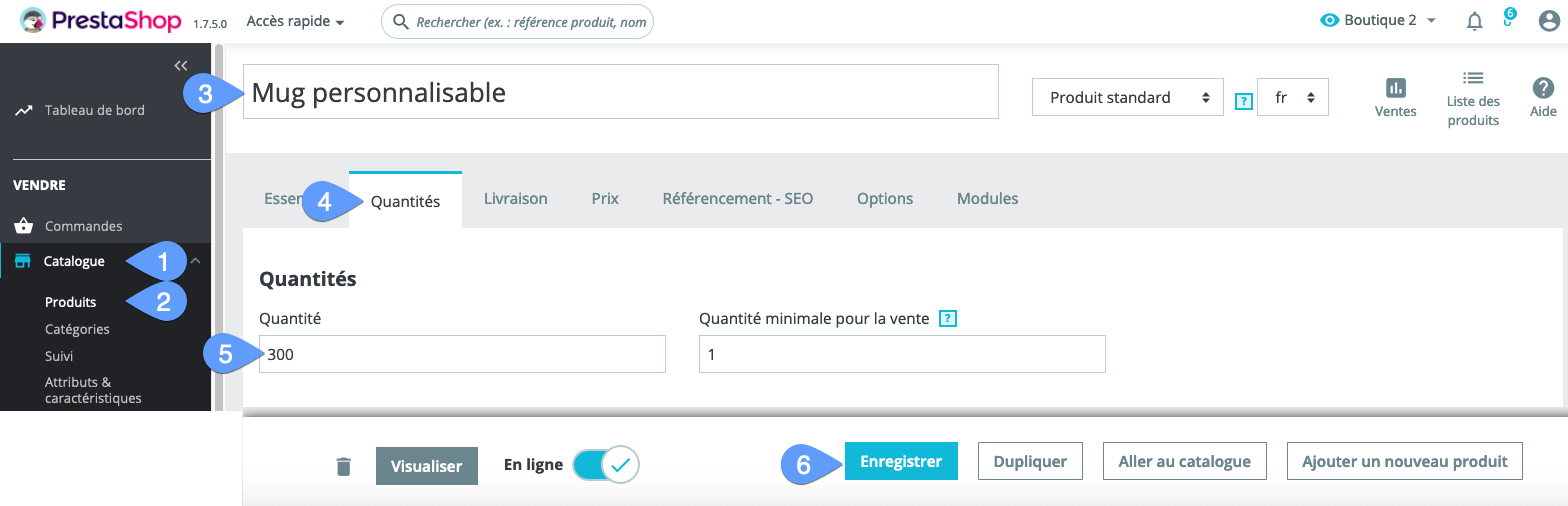
How to enter the quantity or stock of a product from PrestaShop admin
- Go to the "Catalog" menu.
- Click on "Products"
- The products are listed, search and select the one to modify.
- Save
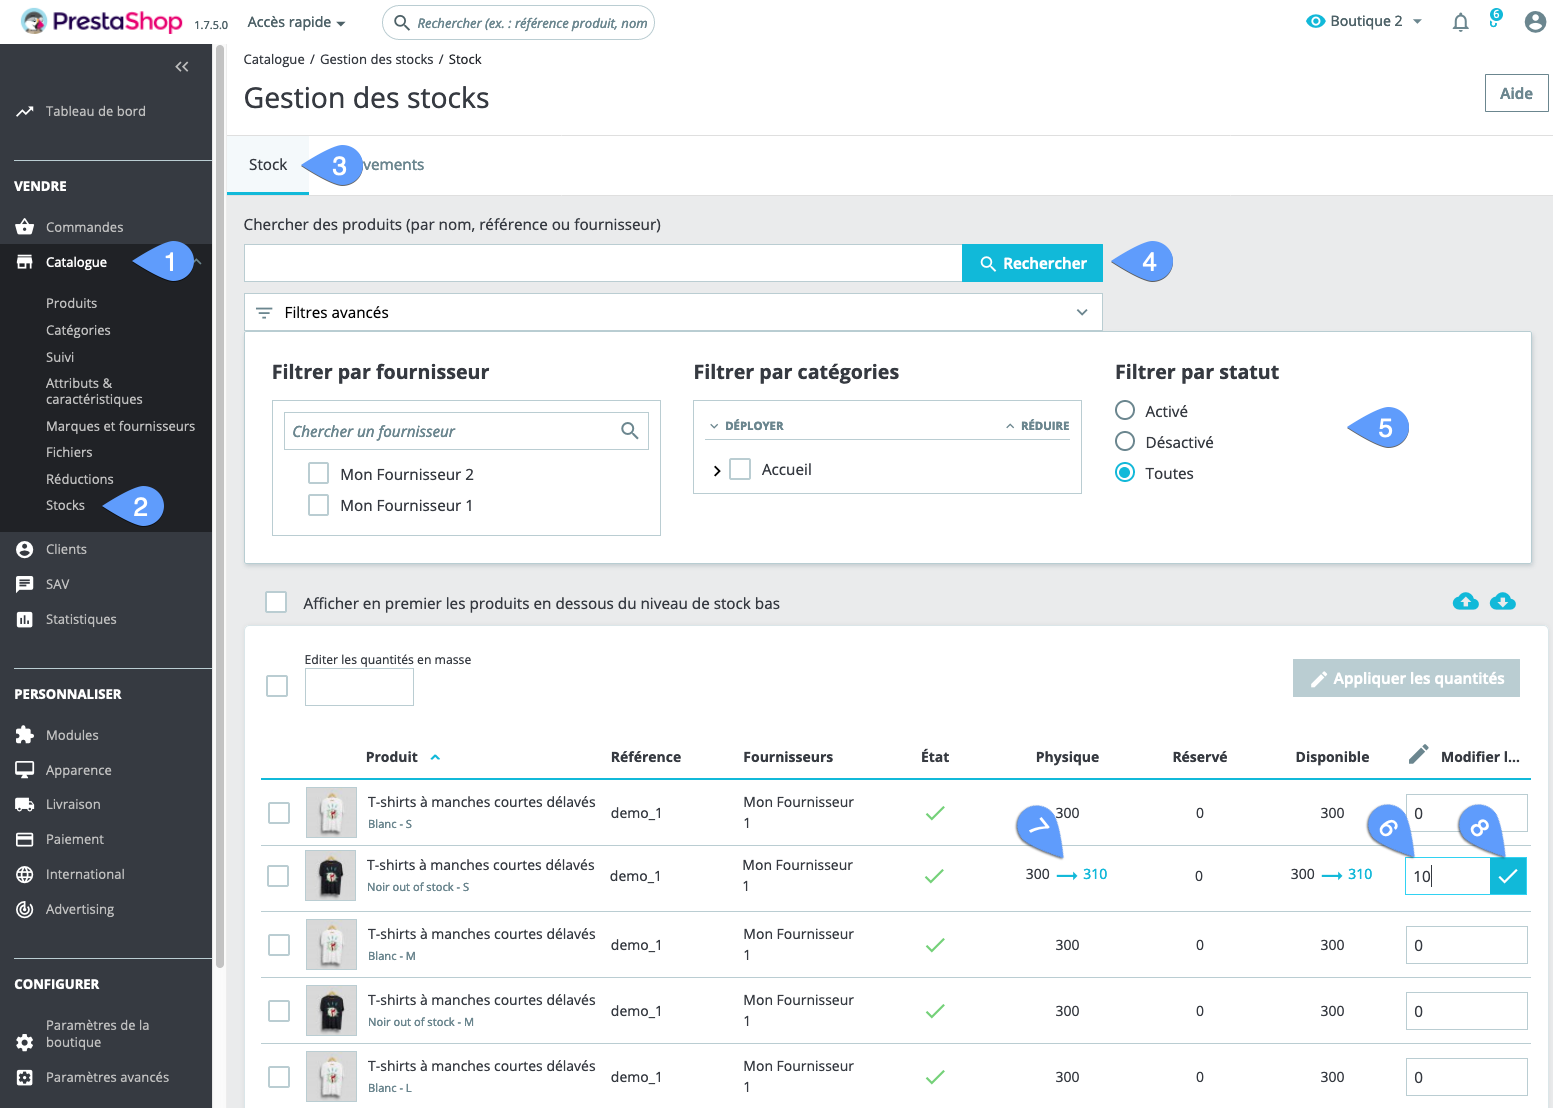
How to increase or decrease the stock quantity of a product in PrestaShop 1.7 (does not exist in PrestaShop 1.6 and earlier)
- Go to the "Catalog" menu.
- Click on "Stocks"
- Go to the "Stocks" tab.
- Type the name or supplier or product reference to find it directly.
- Or use advanced filters to list products from a category or supplier, activated or not.
- Enter the quantity to be added (positive number), or removed (negative number).
- Visualize the result of the calculation.
- Click on the check mark to save the modification.
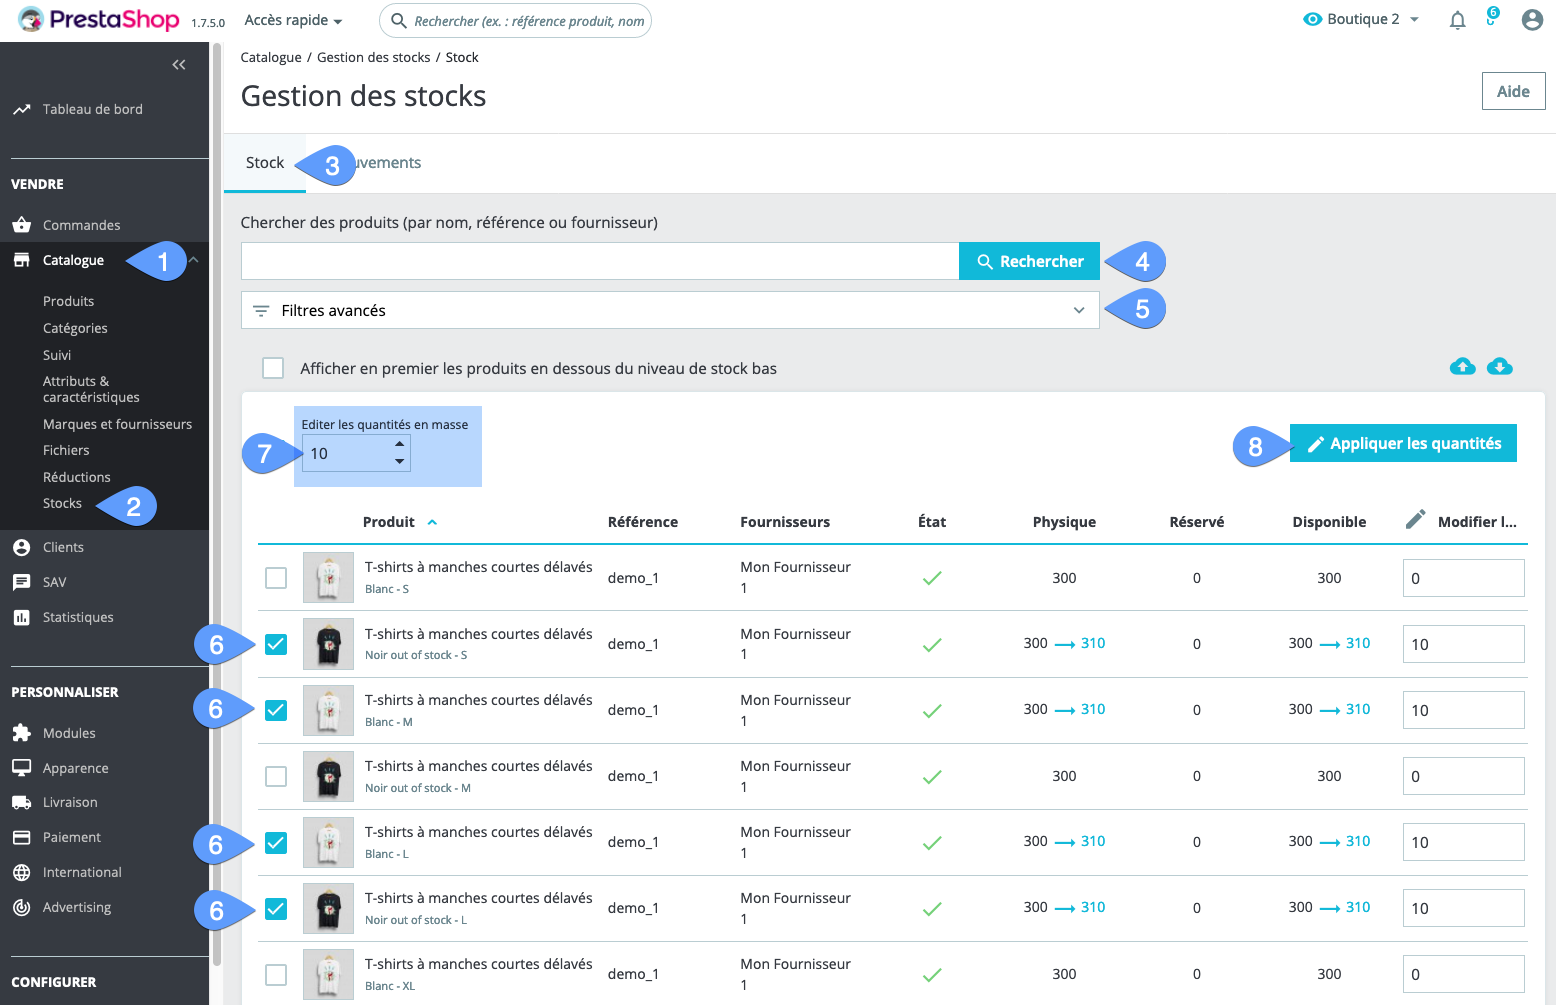
How to increase or decrease the quantity in bulk stock for a selection of products in PrestaShop 1.7
This is one of the very, very few mass modification features in PrestaShop. It would be a shame not to mention and salute it:
- Go to the "Catalog" menu.
- Click on "Stocks"
- Go to the "Stocks" tab.
- Type the beginning of product names or references or suppliers to find them directly.
- Or use advanced filters to list products from a category or supplier, activated or not.
- Select multiple products to modify simultaneously.
- Enter the quantity (+) to be added or decreased (-).
- View the result in the table, for each product, and click on the "Apply quantities" button.
Limits and constraints:
- Product searches remain limited. For example, it's impossible to filter products according to their current stock, or a particular brand, those with a photo, etc.
- You can add or subtract a quantity, but you can't assign a mass quantity, like setting all stocks to zero for example.
- We can't perform multiplications either, or apply percentages (e.g. doubling or increasing inventory by 10%).
- More inconveniently, you can only modify 30 products or 30 variations at a time. If you have even 500 products, in 5 colors and 7 sizes, it will take 583 operations of this kind to modify all quantities.
- The tool only exists for physical quantity. Nothing similar exists, for example, to apply mass changes to minimum quantities or any other parameter.
Modify stock en masse with the Merlin Backoffice module
Start by filtering and selecting the products to be modified and displaying the columns to be modified.
Once again, here's the complete process for filtering and selecting products as well as configuring the table:
- If you're in multi-shop mode, select the store(s) or all stores (and possibly the "Multi-shop modification" mode).
- Select category(ies) or all categories.
- If you haven't already done so, use the column configurator to display the columns relating to what you wish to view or modify.
- We've selected all the columns relating to inventory and we're adding them to the configuration by dragging them into the table on the right.
- Click to validate the configuration and close this window.
- Click on "Other pre-filters" if you need to refine the selection.
- Here, for example, we'll only retain products with a cover photo (photo ID greater than 0). The list of possible filters is very wide. For example, we could have asked you to select only products with such and such features.
- Click on "View" to list the products filtered in this way.
- And on the "All" button to select them all. It is also possible to select only certain rows, to use column filters to filter certain items more precisely, filtered selection, in short the choice of methods is very wide:

Then use one of the multiple methods available to modify quantities en masse
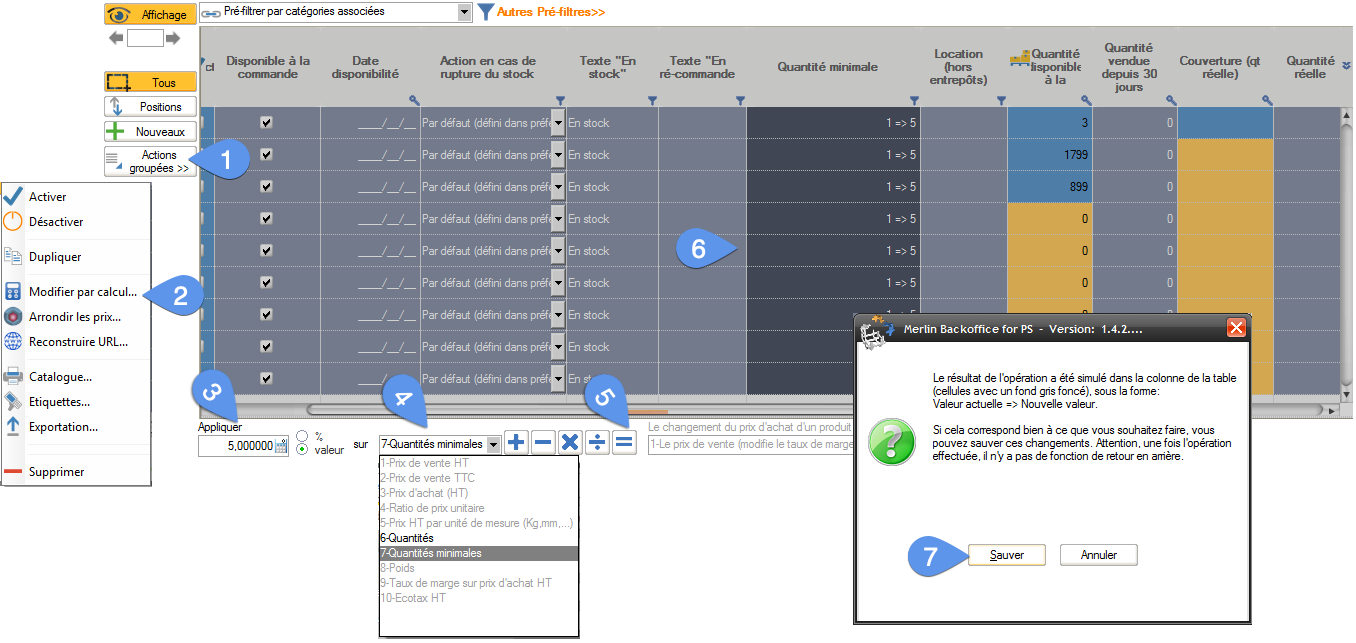
Below, for example, we'll use the mass modifier, to write the value 5 in the "Minimum quantity" section, for a selection of products:
- Once the products have been selected, click on the "Grouped actions" button.
- Choose from the "Modify by calculation" menu to open the mass calculator.
- Enter the quantity to be added, subtracted or replaced, or the multiplicative value, or the percentage etc.... Here 5.
- Choose from the proposed list (whose contents vary according to the columns displayed in the table, the item to be mass-modified, here the minimum quantity.
- Click on one of the calculation buttons, "+" to add of course, etc. Here "=" to fill table cells with the value 5.
- The values before and after calculation are displayed in each modified row, allowing you to check the operation.
- If all is OK, Validate, otherwise Cancel the mass editing operation.
>Increase or decrease stock massively, for a selection of categories
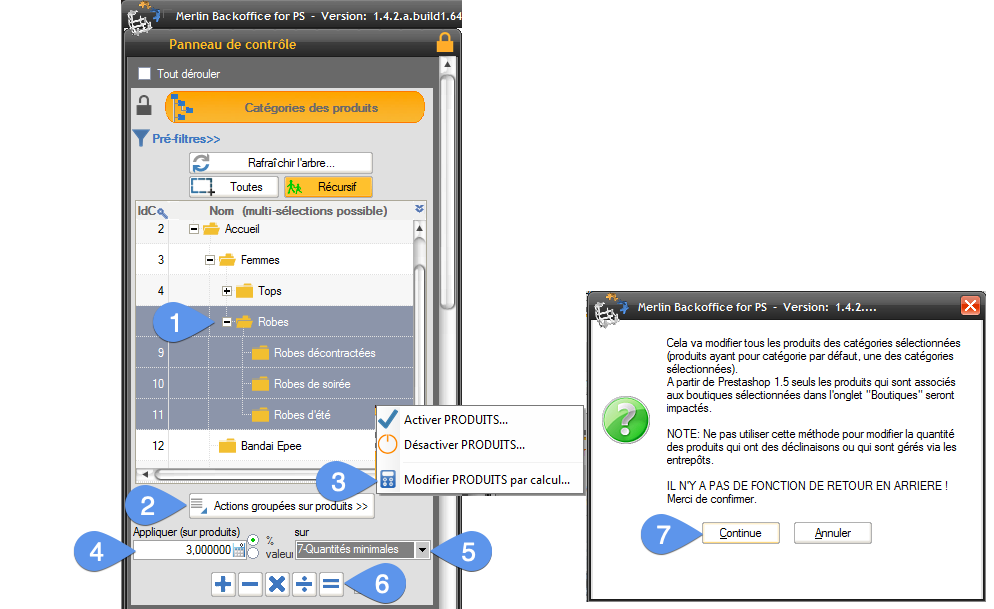
When you start to master Merlin a little, you often have the pleasure of discovering shortcuts to get to the desired result even faster. Let's take the following example: we want to set the "Minimum Quantities" of all products contained in the "Dresses" categories, to the value 3. Here's how to do it without even displaying the products:
- Select the highest-level category (sub-categories, even hidden ones, are automatically also selected when the "Recursive" button is activated (here in orange)).
- Click on the "Grouped actions on products" button.
- Choose "Modify Products by calculation..." from the menu that opens.
- Set the calculator according to the operation to be performed, here we put the value 3 in the "Apply" field.
- Choose the heading on which to make mass changes, here "Minimum quantity".
- Then on the operation, here "=" to set minimum quantities to 3. The "+" button, for example, would of course have increased the minimum quantities by 3.
- And finally confirm the operation. Voila, all products in the 4 categories have been modified immediately in your store.
Category's articles
-
Advanced inventory management module for PrestaShop 1.5, 1.6, and 1.7
How to
FAQ
Video
This article and video explain in detail how PrestaShop's advanced inventory management works and presents a much better advanced management alternative with the Merlin Backoffice bulk editing module
-
How to add or subtract PrestaShop stocks via import
How to
Tutorial explaining how, with the Merlin Backoffice module, to update stocks in PrestaShop by adding or subtracting quantities read from a file with those currently saved in the database
-
Prestashop inventory, inventory and stock management module
How to
Video
The Prestashop Merlin Backoffice mass management module includes a tool for creating physical inventory files. Quick search with barcode scanner, loss calculation...